Google Cloud Storage
A Galaxy admin can configure ObjectStore to persist data on a Google Cloud Storage. In the following, first we explain how to setup a bucket on the Google Cloud Storage, and then we discuss how to configure Galaxy ObjectStore to leverage that bucket.
Step 1/2: Configure Google Cloud Storage
In general, to setup Google Cloud Storage, you would first need to create a service accounts from Google Cloud Console and authorize it to read/write storage objects under your account, then obtain the necessary credentials that authorize Galaxy to assume the service account, and finally create a bucket for Galaxy. In order to do so, you may take the following steps:
Create a Service Account
-
Go to console.cloud.google.com and login with your Google credentials. You will then be redirected to your dashboard on Google Cloud Platform:
' width='1229' height='513' xlink:href='data:image/png%3bbase64%2ciVBORw0KGgoAAAANSUhEUgAAAEAAAAAbCAIAAABDQh69AAAACXBIWXMAAAsTAAALEwEAmpwYAAAHw0lEQVRYhb1XW4xeRR3/XowiCTVBExtsSksDFEMAS4uBRkxMeNEH9R0haExLSyltpfaCpSEh%2boCPJkposrRbG9/0QVC73UV88IG67qXb73buZ2bO/TrnNnMu5pzpfnz9vt11%2b2H85Z/JZM6cmfn9b/Of1jPntIeOwW%2bcgvvOon1n0d7T6Ok30OM/R8%2bcQ/vfRN98A%2b07g3a9Bh85AfedQbuPg0d/Bh86Bne9BrcdBtsOg68dAo%2bdhN/9lf70L9DeM/UKE8tTZ9Ge02j7K2Dry%2bqjr6MfvGPcfwR8/x1z56vgubf1bYfBt85rO46oDx7Xdr7cufsru770yA8fPGG3dh8H9/5E3n5Y2XsafOct%2bPAxZfcxZc8p8PXj6hMnwWOvq0%2beBl89IG89ID9%2bEux4RdlxRNl%2bWNl6UPnii/JdL8hf%2bJF83yHlqbPw4WPqzlfVB46CB46qk8muo%2br9R9S7X5Q/97y09aCy/xza8pL83Nvalh/L%2b8%2bhu16Q95yGW16SvvxTeM/zy63Pb2/d9717D%2bitKx8bV/6uX/5Iv/yRcWlWf/%2bafnFWn5qpO1PXmnZGn56rJ/zuz9KFvypTM%2bD9RqZnwcWZWi7PwovX4OU59Ps5eHkWfEa5dK2Wqavg3Q/VizPgtx/U7bsfqpeugff%2bwnZUL83q01elizPqlY%2bNFrKyjBRFUSYJLcuiWgdlVdHE9YOAV8OeUosAwqokVZVj39RVThU7oatVFa0q8j%2bXst6IuF6MDCyCUFDDthgkaVpVpPVJNzL9PIxzAaVOSPOipHmZF9Ww0LwmIAOTUxxZwyIKZRRKKAQ69oIY48gPsB/gEEc4SqI4nVjiJEvWlyBM4zhblTSOUxwlrfVU/qnuy7KqqijC7a4ADc90sGFjwwoNG%2bs2DsMouR1pmrKWdYbHN0DSTMBxFERhLbgWH6/2o1t9nw3WfewFviTJLY7jMMa27XA8L0myLMu2bY8TsG273%2b9V1Ro%2bVq6FoijSNGX/bjBtgKqqKCFdU76ud%2bb13oLFLTnCgsXPG70lW5g3%2bos2v2jxizZff7KFJUeYB50%2bx7VM04zjOAgChJCqqpIkrUnAcZxur3f16owgCP0%2b1%2bl0ZUXp9foAwMGcATDGtAFCmqqqPM8vLy8TQkZoDObneR7HMSEkTVO%2bz2lIkwSxvXJTEkRFkvk%2bx/e5TrvT63ZlUQaKKnB8t93FIRZFseX7PqU0TdMoikbOMYw4jlVVXVxc9DzPNE1RFA3DME3Tdd1xAmma5nlOCPF933VdjLHjOEWxboYoiiLLMkYAaZofBKZpCaJgWqbjuhAhx3UBhABC3dB1Q1dURRTFEGNBEFrz8/Oe50EIFxYWVFVly40zyfPcNE3mGKIoqqqqaRqEcIMzDVyIzWSQFQVCoKqqZVkjzNM0ZVbCGCOkWZZlGIZt2wihMAzH1ZRlGc8LreEPI5YdIWAYRqMkApCOdMP1AkILQuuUtR4BpvWg0ahXw7dt2/M81/XYmapmU0ppWZYDAlmW%2bQ1c1w3D0HXdJEnGNZtlaU2g1%2btFUaSqYGlp6ebNmysrN9udTq/fz/N8wI05qGmahNCqJASbBFt56q%2bn/mEC62mkLMs8z8uyZJ5GKc0ajGt65K%2biQVmWSZLwPN8ajycWf%2bMW0HWjqug/u9GZqe5b051f/xFcmAt/87dwbiVtll6DwAZHYWuWYy7E4gpCCEDtaUoDCCHP86Io6ro%2bYHjLhURRTNPUsixRFCVJWlMHLMJ0w6wq%2bsFCemgqOPWH6MR0cPySe/A9e/ofuD7xWgSYqtYD8xxKqed5pEGSJBhj5jae59m27bruoLUsy/d9ZihCCMa4JmCaJqU0jmMAAIRwXPcDsxiGQXMaRUm73e31OUUFyzdWHLd2pHFNb94CZeMVVVURQqJVxKtgl%2bBwZzDB9/2agOu6hJAsy4IgyPPc932M8fhpKKVa40IX5vATJ5Vvn1efPQ%2bffVPdewb%2b8k81h5EkuSkLZIR5dBzHRVGwY7B20GGWGQwOBhqlRzUBjuOiKNJ1Y3n5hiwrN27cEARhPK8TQgzDpIQESQncEvkl8moBbuFG5fg9u0kLVE0bhiGllN0D2ebAzFUTWDN1jo9QSk3T9P0gS5M0xlkSxVGY1m2AcUAInYxAeVtazCYhsLCw6DiOpmnXr/%2br2%2b222%2b3l5WVJkkZoUEpt29Z13fd9hBAAQBAECKEkSf1%2bP4qikfmbD2JCiOM4WZaxgmASCwyXKMyUzLgj2gIAuJ43iKdPq87V1DGCJEn%2bHxaQZTkIAsuyFaUuMNidNx4DdRBrmu/7aZoOUsRIrhhBlmU5ofntKIZAKWWxGwTB5DHAshDG2GwwqBlHAqDJQjrGeCgh/HcUq0%2b8sizZKYd9zHVdFiesnZDABiYeMfcdE0izouO7lmNapm07TS3kbbBFNpkLWZYFAEQIxXG8XilaTkSgdrx/277rWZblNdVbEAQDg4ygmohAXU4zL9ygWJ/cAllG81sxwHbJ85w9IAd38GchgDHu97mWoihJkhqG0W63RVFcWVlhehq2Q5IkdS10hwQopUmcGIbBihSO42RZkWWZ5/nxtFvdIYEsy%2bI4Rpp2K4ijKDJNMwgCwzBYPTei/gmCuH6kYxxFt179w4/9OI7Zp2HEcbz50w84/AdsQZjjNHN%2b7AAAAABJRU5ErkJggg==' /%3e%3c/svg%3e)
-
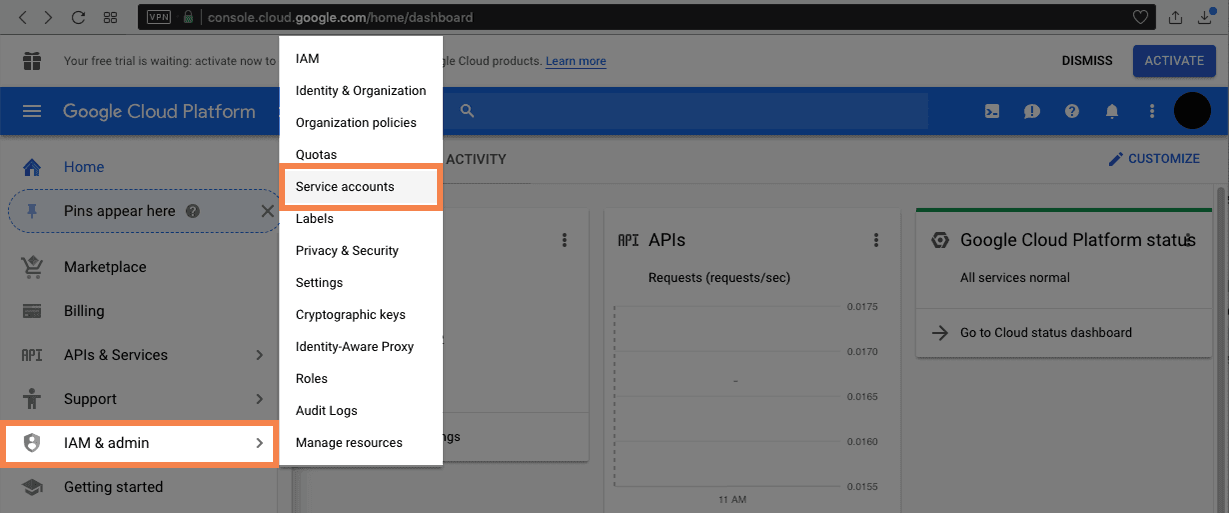
Go to service accounts page as shown in the following figure:
' width='1229' height='513' xlink:href='data:image/png%3bbase64%2ciVBORw0KGgoAAAANSUhEUgAAAEAAAAAbCAIAAABDQh69AAAACXBIWXMAAAsTAAALEwEAmpwYAAAJqklEQVRYhb1Xe2wcxR0%2bFRCqoFBCgIRAlfRhOw9EIUA5v50IKI8Q24j0D8jDrzt79/Y5uzuzszP7ODsSUluJSDwEAY4mpUTgqFIfCSGtCioUgdKEZ0JiO3d%2bx4mTEEc4Z9/5tt1d27rEJEqcqp8%2bzc3Orcfzzff7/WYupKiqqmmKqkqyzAuCqmkrVqxcunRZYVHRzwoKigoXL168pLCwqLCwqKho8bJldyxdumzJkqWLFy8pKCgMBr0XiooWLfrxwoWL/g%2b86%2b57Y5wAFCXKKS2sENIgDAQARRFFSdW0mpraysrK8sqK0vLyysrKqqqqioqKFStXPrlmzdNr1z755JraJ56oqa19fPXq6uqamtraBx96qLyiorikJFxc7DEcDhdP8v7w/4YlJaUlpaXh4pKSkvDjqx7WVBnrqo5UjudDkiQjHRNqYoNgw8DYMC07oG07XuvEIdJ/t2Wr67rDw8O5XM6dwsTEhOu67e3bIUROPG7ZjmU7jtNqOm0B420bWy%2bb8dY2HRsQ6o5j8YpdvlqpqgGVq6WqasDycijaWKdDJW6bBENqQIKhaSCCNYxUakBD10wDqbKQeG3z%2bPh4f3//TAHb3nwDSLyhQx2pGKlY1yXVkFUDaIZjm62ONTu2xb12Y9xyLCpwDMtETQzqm%2bHtyyNFJUxBSaygOMbGxNCqDXjVev2x9fqj6/RH1upef53XD9pH1%2bmr1hsr10jGM6%2bMj4%2bnurv7%2bvp7enuTyWRPT09X1%2bHMePrZzW8/8Cu5toFU12Gfek2dXu1z9YZL5qr1k2t4ZC16bJ3%2b8NPIX55RXW%2bsWo8ffgqW1cjlT6hljzVV1AjVa6XQreXg2nvluWEwvwwsKAc3FYNbSsDcYu/x1nIwrxTML1NDS1pWNjzvurmho0e/8XHcx7Fjw67rNtu/v%2bE%2bdl6ZMics3xiWbywGN4YnObf40jgnDK6%2bS77iTnlOGBQ8oH5/uVz4oNcuWgGu%2brl0e4Xy/bvlH4a1a%2b6MfO%2bKK0PXFy6sFEJzw/J190lz7pfnlckLq%2bS5xfLNJfKtZeDmYnleqTy/VL6tQrnqDuaXkeez4%2bmvvz6QSh7uOHSwt6e7s6MjlUy6rss6W69bzt5Wod5SIl8mbyqWr71Huma5dMP90oJy%2bfr7pB9VguvulRaUgWvvkeaXef3rfyH/4G726jk/uXJBxU%2br%2bBAjQkaALT6jHGzmPQadqN9pEfQNEeHZ5zfnXPfoyVOn0%2bMTrpt1Xa/1c%2bCV1994qq6liQURFkRjXnXz2tmRU5p9RmNKI%2bs9NjB%2bn/EG6xnQyCgNLUoDozXG9GYBN0RjoShn6IZJqCWqlBCrNW6fw7ZWxyBkywvPpr/8Z8ff/zjw0Ttu6jO3%2b/Nc8tPxjn%2b7qc%2b2PvcbJsaKAq%2bpim2Zlkkvh%2bYUzxq3qG1RoBqCjFkJsyKOxDRCiKLIIR4QqFNCLQ1bBrEsv3R6NL2W%2brNpxHptIz711UeHDuzv7TjQtf%2bLQ19%2bmjzwxelvTmT6O/7wDAbeFAb2YVwGKCEmofR8NKhFpyRRalKT5/mQrFFVtwRJE2WNlzROVHhJ5URVAJCXNE23IDZjKnnOgmc%2bf6//q71H9%2b8Z/PKTgS8%2bOXpgz7d9nROH9735a6ogTIhhkMuFijQJKjMp5z9qPr1Bta6uLsQBoiCTE5XmmBBpjjVF2ZaY2MwKLC%2bzvKxhCxo2K6jPbdqUHez86r0dQ/v3uKeHcif73RN9E0eS7smB9je2IF23bdvKg2mahmGYlnXO%2bAVACBEhYFUhpkkcknkEOChxUOKRzKoiB2X/UeagzHvfypwqRSKREDVtg5jUckyn1bJbrXibacWp6RjUJqaNiWlQC6jw1cTrE647dPzk6TPpU9%2bOnh5Nnx5NB0ncvn07hNBxnGAdtm0jhKgXfKYgijzPsywbiUQopedbOqVU13VKKSEkxrJAkrkY1xxtjrExgRdibCx4ZFsYgeMFXmBaGLaFIdiIRqMhSZIIMRCCsiQBAIAsIwgty7Qty6NtOY6NEEwkEtlMpr%2bvb/jYsVQq2dPdnUomx8fG/KtEO0TIydvpYPXEiyoPQSfQlo98u4L3CSW6rhPDQLquaRBjHWOMEDKIN6Lr3qOOdYgQhBAbvgAAAMZY0zRBEHhe4DhOUZT87bFtG0JPQCaTSaVSAwMD2Wz27LtQe74DwZ/kh5AgeNMKPoIOLwgAgGkNgR6DEEppPB5HCAmCIPnwr5giQshxnHzxjuMQQhobG0Ne7vsbQCm1bTsej%2bcvJV9ALpcbHBwcGhrKZDI5H%2bcTMJkDhJimGQQ3xtjzwbfCN8Tb7rOyxXcgCLNJ93wG7lFqnjN54HN9fX0oEo1CCEVRbGxqEkVx2tCZArLZbMpHZ2dnd3d3Z1fXqVOnLiyATMV9sNlToeNzavtJXgIQX/M0gqUEs9EpTH9LCNmwYUMomMVxnHg8HlgTIF8AQiiRSExM5AaPHBn2EVyHRkZGLlLAxYD4DqiqCiH0okf0IAiC/ylyvAcAQBBLjuNQSpuamkK8IBiGIcsywzCxAJz38rQJjuMAABKJxNjY2OHDh3t7ewMf%2bvr6unt6LizgApVnencIIRqEngOU6hj7uaoj5CUtysfUYHBcetms6w0NDSH/0DYt7wrg0Ys4/zSdrEKWFbdtNJXEAwMDmUxmxg%2baSxCQH5wzHbikYxtj7DkgKRoxLahjoEFFQ9Ry7NY2O95qOfGATmubCtFridez2Wx/f386nQ6WnsvlgnJ0SSE0UwClNDg3KKVBil8kMMZeGUV8iwNlCniFaVKYpjgCGw2tVVemudHQdIHZ8upL45nMwYMHezz05juw3T/IprM/gLeai8sBM68KXRImBRx6/689H%2bzo%2bdc7nf/4U99Hu7re/3Pqgx0DH%2b/O4996P9wx9F77mfTYNydPjvgYGxtLp9NBOG3dulVRlNnlgDVVYYIQmo2AgWMnxs6Mnjh%2bvKuzY/jY0c6OjqHBI%2b7ZyGYybufHIyMjyVQqmUwODQ319vb29fWNjo4GAoLi8B0hdHZZPKdAT4c%2b9JN4liG0t33znm0v7n3rpU/bX9731kv73n5539sv79n2Yj73bnvhw8Rv/7Jj565du959993pdufOnbt37960aZOqqucWDYS81cxw4DvvdraPWTqwvq6eEyWG49fV1TVGmxuaInX1DdEWRsOGivRpKggzDCOKonw2JElCCJ33n%2bSdO9OnT/5hZPojQRmdpQOWaTq2Vy5NSrwfRJT4HbM17uTTsSyEkGma51zIbNuePkRnYmbAQAi9Gp3vg/8DbHY58N/r9H8A4Gge5gDwDSgAAAAASUVORK5CYII=' /%3e%3c/svg%3e)
-
Create a service account by clicking on the
CREATE SERVICE ACCOUNTbutton:' width='1229' height='513' xlink:href='data:image/png%3bbase64%2ciVBORw0KGgoAAAANSUhEUgAAAEAAAAAbCAIAAABDQh69AAAACXBIWXMAAAsTAAALEwEAmpwYAAAI%2bElEQVRYhaVXW4xdVRk%2bEtKKQO%2bWpoB4eTFGoUU6nelML/hgTDTCtGj0rQ%2bdM/u%2b7te91t77zOn0og8W0ZYH33006AvlyZeWiibGtJQEIRY1Q2nSKlDUhOKYtdac3dO5kBa//FnnP2ufs/f6b9//787mMbR2BG0aw5vG8MZRJ5vG8Aa/PjCOPzuGN47h9TvxmhG3s26n0zfsxOtG3M79O5ysHcEP7cGf30ce3MMeWlHo1gmy5TbkgXGyZge%2bb%2bG2ZM0IfnAPuX8H3jLuHrppDK8fxWtH0JqdbMNXJrd88fHOw3vxvU/gdSPoc3vQl56Em3ehzbvQI3vhlnG0dQI/shdtnUAbR9E92/HWCbx%2bBKwfAZtGi/ueQKu2oU89iu56FK/e5p6xeRyu3pbfs30lKdaPEucjJ2TjGNm0gmwYJXc/hu/6Gv704/jL3ySrt%2bOvfove/Rj6wpP4M1/HD%2bxyhq3ahlY9zu99eHTjhnWdHd/Oxr4Lxp9G45PYydNoYhKNT6Kxp%2bDoU3BsIG5/P9l9gE7sJ14hu/eTPQfoxCTePYkmJmGdsueqIyfKwyfMTfnJwtfZZ3Xzgx/mEwfIN75H9j1D9j2D9x4IgrzcorvDeBl7yq2jft012JyYRLv3o4n9eM9ktvc7Bzvff2YyiaasUaBIGIGcIowKTlFTlb3atNLvVQhkCGQUA04hAhkjsMgSW8rZwzON5u%2bc%2bfWH8/NvX/vo6vX5q9fn567NX3l3/h8fzF%2b7/t/L781/8O77L5yoAMacIC2ZEmymqfq9elk5PHOLzPbrfq8yxsz0aiY0pBoxTYXOcalN04miGCIslcKYUMoIocR9Ml2aVsrSVFVNCMWEEkopZZgQQihCWGldNU2p5Bu/%2bsU/33x97vyfrrx24crF829fOH/51fNXXjv/zsXzcxdffe/CK788piGTUkitS61LW1VVVd%2bUemhdIraqdVlZWwtlmLRcWaEtFaXStmOtNR52CMaYcgClFKWsruu%2bx4xHUPr9fq/Xaxx6z/bkyYad7PGTPf7zsDbsuYr%2brHbyXEVnK1P7nzZNUw9grSWUGmOUUu0Ty7I0SxBOaa2trLFeKn/QTlEUUkrGOEJo%2bNytVUopAFFd197rhDHGufAKxxgzD845pAwyCZksCEdc5oRjocumr%2bsZXc%2bUzUxVN7Vz8U00dW2MzQtgjOl2u1NTXb%2b6D4RQ69mPR0dr3R66qpxV7Rp%2boZSCyBmQewAAIIBBybIMIQQhBAAkcQTyXHCWZxklJM8ywflMr%2bnVda9x0ji56f6gG2sLb0AItVJKShmU8vbQKQCQUgohEEIYY5fZ/gMhJKUMEQgGKKWEgwzgXHAhOBdh38VlcFn4G1JKOReMMXfVR4lxPvjKCaVlWVq7EIFFORzc1%2bbz8KVFqd6RQpZlqb0DpJRa6eADp2vdGlBVFcYEL8ApyMGtvuaZU3yBBz8g5DIOOVeQHMkE8BRwKrRPX4fSmBDqAjgDIEQAgKIo0jSFEKZpmud5MUDQ8jxP0zTLsrCZZRnnvJPnhRDOi45cmHNScJgQIpSOMwAil7/VLRkc4LhkyX67E65aTyPW7TW9nkuhQTE3xtgCQGPKogBRFKdZGntEUZxl2fR0FMdO6Xa7aZomSRInSRTHSZJEUTQdRUKIDkJQOWcrRil3FjgJujWu0rU3IJxmgQfuEK52/RqCHhxvjKnr2tWAM8DkeZEkA9/7OGRZlmZZULIscwHxVZckSZ7nSZwUBbDWdpjU0lhZWq5KWVpT98qqMXVT1o2u6rJuRGmAj0Bd1wghrXVIaErpsjFZFlVV9WdmUufU6SOzsxDCbrfb7/eNMQMD8pAbXnFskSRJ4Ik4dopLKABShwx4JctzpVRHJwcPk/QwSar80AyKf6TgcQmOCXBUuPW4ALMsxwg6bxnDOf94tl6K4V9qrZVSrTJcA8HN4VhBj6Io8F4URT4cLh7T3W7uLsVJknLOtdadiy%2b/8sa5M2/87uyCnDv7%2bstn/nzuzKU/nL30%2bzOX/vjKW7/9zY9ZoqteqdXU1JQQAkI4NTUVjAlHWQla66Iout1ukiSUUqVUnueU0sDCgYWCAUmSdKenk8TVQJK4dI8iVwBBcZmToTgFUQpy4IiBMhbyuXPhb/OXr92Yu/rR63//8M25G2/O3XjtrQ//cvnG9f/MX//3R%2b/fmP/X3F9PsEhWvcqaKIrCiX1P8%2bMEpVLK5XunR7BkmPu01lK6nYUIuFQ24W4t4bbwDMe4EJCVmBvE3CjhmaAJNdl56fljp08ePX3q2OmTR06fOvrS88ecnDr24kkvp46/%2bNPerMTG99E8z0MihdoKIQ4Plrci1GjTNEIIjHFV2bYYQs8KHc0MijgUFUKIMQYBcDTtCdsRtONiTAnGCBLsFN86CwjdHztTcYoYh4R1kwwQyqSmXpi6Kbp0p6nrOkw%2bWmtKKSGuG4QgeApmYQ0u1FqHv3gWhpzzcGJrnSVBd6PEwIDAkhAiQgjwBuDB/f3iVt9qF76G5zoDrCmt4/uydnOSrYypKzcwVaYVl%2bqLCP420TSN9H3QGeB3ggEtTNvIfOdrW8dCAxlqzO3OcJNxBuR5HuYCCN1NMMbQWzqc1mVZ3tG5h00IBcM5r1c2wHpeCnNXmABaBCYYYoWFealFZxHfBWIJt1tqQK/Xu1ML2r6x1IBBCgFjSinlwYMHoyjCGB86dCiO4%2bnp6UFXjlwPjuPI60VRuLFqgE6WZT4CHEKIMVmWT4IB1to4joOFbRaGYpBSDkd8OPRaayHc2Ff6qggspJRalEJCiDRNAQCUUj/puLkIeAwUN/MWRYExvsUAIUQbrMAey8Yk5FwY04UQLQWFDhrYo%2bW%2bMJaGU7oagJBSGnwfEldrPcRCoE2h8KzWiW0TXDRCD%2bdYJ02z8DyMcaCT4NdFWTScQmVZBh8M086KBkgFIBRCrMhChesDnxgd4hukUmr42YEHlxrwCVhIubdt3BowfIf2jez/MmD4nXjRteGo3WntDo7YKKWJe7NZnoWstQC6V9lPbgDGeJGzl8Uihr59hDcNytjwy%2bowbufpH2PA/wDzyFuuCSNGLwAAAABJRU5ErkJggg==' /%3e%3c/svg%3e)
This will create a service account under currently selected project (e.g., the
first Testproject as shown in our example figures). You can select a different project by clicking on the drop-down icon next to the currently selected project and choose a different project from the pop-up window. -
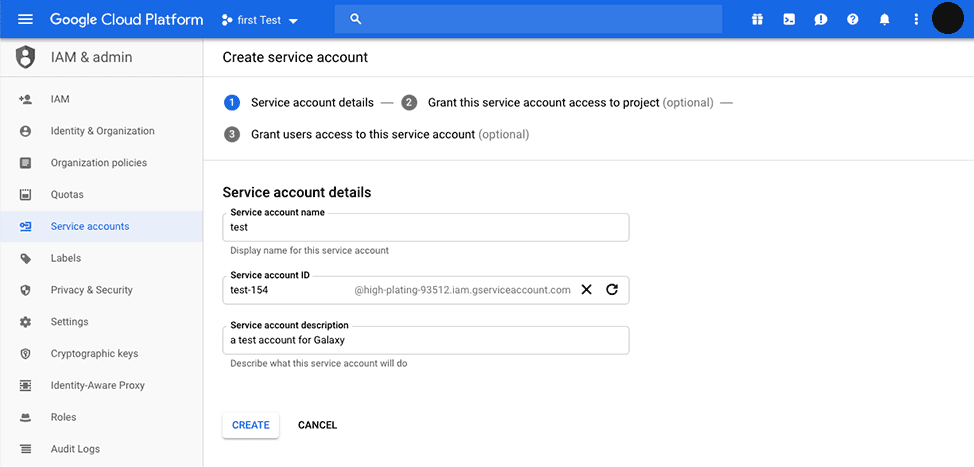
Fill in the required fields for the service account details, then click on the
CREATEbutton.' width='974' height='467' xlink:href='data:image/png%3bbase64%2ciVBORw0KGgoAAAANSUhEUgAAAEAAAAAfCAYAAABXscv8AAAACXBIWXMAAAsTAAALEwEAmpwYAAAIM0lEQVRYhc1Z249bRxm3QEJ5QMpLglIVtRIblQIqgtIiShBPiGcEz4AoUqCUNCFtoW3Ipt0tbbmI/6ASAtI2IY3KIwrqA0pKI7LbbXbttb27vp2Ljy/H99s5tn%2bDfp/POMfOQrLdddqRfprxnDNzvvv3zThy/0kLnzluYe64hS88ZeP%2bJy187kkLnz1p4b5fWPL7S8/Yo2fBu59%2b3JR5riE4d%2b8xE3c/buLQYybmTlg4ciaPB5%2b18cAvbXzxV3uI0H6kg98kfXc9ZuKR%2bTzuPWbhoVPsTfk2abvvpIXDJ0Z033PMwcEHf4gDc4/grkffR%2bQrzxVw%2bISNu39m4htn8vjWiw4ePmXjgadtHJknE3kcOePgm887%2bOqpvAjl4FEDDz1nY%2b4JA3NPmDh83MShnxr45I9y%2bMT3szh4NIcj8za%2b/IwtHyYBXLfX4Pf2/9jAt19ysO8HOXzvj0V86icGvvOHIg4cNfD1%2bTzu%2bbmJzz9FOkzsf9TAgaMmPnboa%2brj%2b/Zj33cvI/L0qwk8%2b6dNvPCGieeJ1w3pXwgwfzaHU3/J4vRfszh9Noszr2WxeM7EwnkbL18s4jcXHLz05ggvExcd/P6tAn73VgG/vZjHKxdMvHLBmglePG9i4ZyJ%2bdcMoenXZw0svGHiNPtgXvh6fYTFcwYWzjtY/PMqFl59B4t/KyDy9j/%2bjv%2b88zYUOkgnV1HOZ%2bA6WdjZJFwnA6V6UMoP4EGpPqHM9DqS0SVkN9dgpuMwUjFYmQSsTByZzajKbKwp18mpO9AQwq3mb3ovsrG5hUzWQKvdQaFYglupolR2USy5KLsVmW93uqrV7oJod7rw/D4q1TrsvINiqSwoFMvBOo5LcApF1OpN9AdD%2bP0h%2bn32A3j%2bQPoxpn9vA1lz03vDXYDr%2bzKO9DnwffR6PXieJ%2bMwOK/R7XalByaEOC35STVMvrvduv%2b7/hZ7Cy27QSSXyyrHcVCr1ZBJpykE1ev1JsA5Pe97nuoPgMU3a8g4bcRjqyqRSCKTySCZTAo2NjZw/fp1xNfXRahOPo9Lly6hVCohuraGeDyOra0tbG5uyphr%2bTuVSsn6TCYtz9LptMxFo1EkEwmUSyWQ1mKxiGq1KrROa2OnLRIwOday7/sq0L7SCJjXViIfvW4qtHtDtFtN1e50xDoajQZarZbqdDqK42azKT43GAyE8MFgoJrNpjzvdDpoNhryu9VqiQLIlO6Jer0uPQXHvt1uC7hWWyJ22SKUcj6flw%2bnUlvI5XKwLEusgeN0KiUfpyC0AIbDobryr38q1y2L9gzDEHCfvG0jm82K1rmez03TFPA5e77LngxWKhUBhb4bTX5gC%2bh0Omrk213pAz9XlDTHlDZ77QI06eFwiGg0JhqmORLUMDXFsW3bKJfLIwRmS%2bb5m2OCY1pJvV5Do1EXV7nh1neuReLxdUWN0XSz2ZG2aAGFQgFGLgfHyY8DpHYXmjSJpSCm0s0HBhv35Z53EpF6va4ajaYwRzegWbInaJrstemHYsBtm9hOIvKH0SLUtuu6NGdF0%2bWYwYo%2b3%2b/3BUEWgBcESY7fffffWF1dxcrKikTptbU1XLt2DbFoFFeuXMHly5extLQkXFG7u7COmfpFpODkVbVSQbvdAYMafdL3WQ94YvadLvO/J5Bxryc00W10yltfX5d0Fo2uSeqi%2b2g/Z9utmQYC3HXK29YC1k0fScuDUfJUwvLUpk30VMLsSl%2boeqpQ9QVOxVNufSQARvKV995DoeAowzBoPYrxg8yHP8CMsRvQAoNYMxsBJG0fW44Hq%2bwhbnpIWj0kzC5iuS42rC6KVW%2bMQsVDtdGjwyrGB6bH7cx2L4MZ0yMFMTMBuOWSYhpiunPLRTQbdfR9T%2bB7Hk0%2bAN1gNCYtLF50VUats6fJa/MfzTuCgImdCWYwGL8/UxdwHEe02W63FQNitVoDzS5cBXqeLod7yhvFAKnmmEFYIzCFNhoNVa1WFYnW0MzsQYoU/veaeTZJg81mS0pMFjaEToNMiTdqAKkDBFzIKu/q1atYXl4eB0EGRs00D1m0ElqW7vX%2bHI/Qnihv%2bZv78x26F62JyuH3dNRWe9wiDF403WazMS6CdMlKkLDwWYD1AgmhibNQ4js6SLHRX0lnr9eVfUaVYkGqREJKX9dFuTz6zW/rnqjVqvIOmefefDZTATSbTSl7e93uWBN0AdYCQQ0gTE8VQhMXC2Sa70/5uDzTNEuxM1UYjeZHe4zmxs8nKsSZxoBUKiVBi%2bbOHE4zpiDCDId7CoO0UDvLy0tIJBJSCMViUby/siLHYBZE1CLppSsQ4dgQYCJebPNMK2G2Auh2u2PGtJnr4yp7zXzIEoSgcrms6PsUIIXA8zqFx%2bqQAiHhwTdu0ubtNq7hPjOtA0zDED/jyYzHYVoBLyNY6PAoGz4Kh12AgYplsz67j84N%2bgxfkb4eBFI%2b04cobRE7wawtAKHTnvT6aixk%2btoCxi4gdYPrBkzry4xqcMStMyXKHH/vxXl/FsyzRdZjMX05oXgtxfSmswHHPCBtcxq8FTHbPt%2bxD0y6w0xOjJHQ3d/44lPnacYHff0UtoRwkP4fCeqOMrHr43DFdWmmir5P375RAYo7jMciJM8TLjoeUKgNVKk%2bUIMhpHRlzud%2bDJ6zNNu9bBFWaTrtUdv0Veb/8EXpRBoUAQxRrHaxkmohlm2h1fEw6PtyNOb9gD4RbmcaH7UWMU1TkWBq3pKLS1v8fkLrU4UQjyfDgQ8FH2roY3Aj5ek2ZvwjL4BmcC1NKwhfiWnznxJAKAZM/ecUtOD0puc%2bJLZuv/0XHbhTe3/w70EAAAAASUVORK5CYII=' /%3e%3c/svg%3e)
-
Grant the service account with permission to read/write objects in a bucket under your account (e.g., by assigning the
Storage Adminrole to the service account), then click on theCONTINUEbutton. See the following figure:' width='923' height='379' xlink:href='data:image/png%3bbase64%2ciVBORw0KGgoAAAANSUhEUgAAAEAAAAAaCAIAAACIHs0YAAAACXBIWXMAAAsTAAALEwEAmpwYAAAILElEQVRYhcVXa2xT1x3PmDqhdlAaKKJ0q6Z%2b2icqUHkqdOu%2bDAZV2TSNQVgR24AQJ773nvs459yXrx0C9MM0bR8nQT%2bMbQxQgVVim2gC7UJoIBCHlJE4CXYSO36/7di%2bduzp3Ju4IQFKRiR%2b%2bun46OrK9/87/%2bepWbKuaeUWsHQ98%2bpmsHIL4YrNYOVmsHwT2b9WR9ZXN4Olb4PaDbT2%2bzOnL3WcPHv11LlrH52/durc1ZNn2099HU/%2bve3PFz5r%2beO5lVuYVXXsE7hsA/j228zrW9kl65k3fsAu20D2yzeBVXXglY3MCmIVs3QD9/Jbv35p2aqXVq9dsh7UvLCm6fV3%2bBfXgVfI2%2bDNd9najUTA6q1gxSbwna3sa3VgdR27eC1Tu5Hu7umbLOYKuQk9n9HzmaKeqzwFJicnK5VK338Hl62nlm8CtZvI6dROb5ZPc8VmsHgt88019BvvsN96i37zR9yL65jv/ZB9eT2zqo4Iq90Ilm2gF6/jF39/7zcWLVq09LsvrKFrtu9ufvdnlh/vpnbUs9v3stv3sD/ZO8Xte8C2X4Jtewh31LPbdlMdN7rz%2bUI8kYzFE8lUOp3OTOTymexEJpfPFvRsLpfN5ecync2VyuU7ff3bdlO79gu7PhDe/4DftV94/1f8e/Xse/tmkttZT2wwV2KSYY%2b5N63aWc/u2Mfv/Pn%2bHbuP7Nwn1MiY3/OLnzLWI4oEAdUosFaBpTjQLEK21aG2OpRWu3LULp9otSMBdHd353K5SDQaTyRCoXAoFA6HwvnSpB7xZdtPp29cynReJLx%2bYWrTeTF742Km80Lx1id9p3%2bnykiVoIQ5VYJIAJqCPzzmONFqP9FqP35UO9ZiO35UO35UO9H66PUhHms93tpyrMVWw/MQAFYQEMKiAJEgIEGAAoQQYVGUq1QUleeFnh5nPp9PpVLJZDKeSMTj8UwmXa5UdM%2bX6e5/3%2bvr6%2b3qHOi90/NFp3d4UE8nsrFwNhrKRILFdOLuR8d5hmlssv724KFDhxt%2bc/CQpakZIixABBGWZEWWFUVRn5oEsqzWQAhlWZYkWRQlSZLJQ/JfBJL0FRVFxVh0Onv9fr9nZMTt8bjdbpdr0O12VyqVQiyQu/5x6OrZYNuZYNuZwJW/Rq6eC3z6t/jnH%2bu3/5Xr/mel98q983%2bCEKmqKsnkW4qiiKKIMEYII4yJ7fOHoig1CCGKojDGHMexLGvImg1Jku2a2mDF12/2JhNxfyAQiUQCwWChUDDTtFAsFifLgVB4bNw/HgyNjPlCkZjPH0xlJ6pJPDA4dPDQ4cbGxoaGBovF0mixHDbAshwDAMMAnhdkWbbNB6qqEgGGiZK5zkJVg6qqEIk9zrvJZDIcjoRCodHR0XxVQKGgFwo%2b3/jY2JjP53O7PYFA0Ov1BgL%2bcnmyXDYEDPRzHC/LEsbE15IkYYxFUSTfJV4nmJf1XwmwWCwIIY7jrBQFAKBpmqIJKJoWxSlhmqZZrc1dXV3hcMTr9ZbL5ZmFslAgPohGY34/cY7f74/F4sFgKBqNVioV82WXy4UQdjgc2jTsdrvxa6s%2b%2bT8FPBwts89%2b2gM2QRB6enrSmUwoFJ6YmCgWi2UDUx7QdY/HMzQ0/MDt6e/v9455h4cfBIOhagi5XC4I0UwrVVWdr8WPFtDQ0CAYoCiKIQCmH3ier6aEkXOS0%2bn0%2bXyGle5sNls9XdMDpVJJ1/Viqajr%2bmRpslQqmaZXBQgQml9dKCiKQqrQrLgXDczNAYSw0%2blMJpOBQCAajQWDwXG/3%2bfz5XJ5Ynex%2bOROPNcDzw7iAQhhU1MzhJDnBYqiIYTTp24W2qm40jStudl68%2batRDI57vdHorFIJBoIhtwjI7l8vlgsPY0AhEkOmKG/YAIEHmKEzFM3N0ZVMF0xRSxKZg7cuX1nfNQzdP/e6IMhn%2beB696XkaC/UikVsqlS6WsEDAwM0AwjQIFlWYQWxhWqqtawHHewCdMsamLQ4WbUSJH1sBVaAYIIkd5stGdVtTEM88WpD%2bP/ueBrPx/tuJTquhzr/CTZdblwtz1z4x/53nZi7MPVaZYAq5VUOYqiBEFYSAFAkHiIIRIFJPIQcwKh8aRKpNo0HjAdfxAHuzt7Oq6F3a6J0Hg26MsGxybCfl/f7UTbX6o5/YQQanEQLGQIYYQZmhJFDCFkaFrEmOR2dZyYkcQCkm6fP1kZ%2bFzvbSv2thfvtum9bbk7V3I9n07cvJx3dZfKlSJBaRZ1Xa9UKvfv98PpyFFVdb5N90llFCFkFh%2bzJ5hz0syZQpJkzaZSAN123gulK%2bMxPZwqeaPFcKr0uLif64GhwSFTgMPhoGn6wIEDDofjGVvBlAAGACyKEEKO43meJBnHcbwgzBRgs6kMh69%2b1uEeCfYPjg67va6hsWG3NxwKRcLhKT4G4XA4lUrd6u6uemBBupjtUR6AGGOzqcGHO7Q5LGIsqoo5sZJVUWRs1CiMxccRYTy1QWTkfHajH%2bUBhsGY5ADLsmYfmDuTKoqiaRpEiGYARTMURcalZquVZhiO55%2byu9oWGqopgGVZLIrmRC0IUwJmaTAPj3Rvg6pqU2226f3CWza/TgwhJF0MY54nwcMb4Dhu5ihhCrBrNoed0Ixku93e0kIKo%2b05QTU9wPO8WYKM7CWJbEwW/FwPIFEFgsIKCpZUTdMQwjRNcxy3sBPOvD3AGQLMNMDmHc8AxmK1CpFrqKpSLLbQ%2bAiNWV7UNBvHcUeONFqtVtvz9UCz1YoQucsDAIyLJVk5jjOvy1UPmAOszUZoBr9Z1O12%2b3MU8D/84yDLgrlQQAAAAABJRU5ErkJggg==' /%3e%3c/svg%3e)
You may refer to the roles documentation page for a complete list of roles and their permissions.
-
On the service account page, click on the
CREATE KEYbutton, then chooseJSON, and then click on theCREATEbutton, and then click on theDONEbutton.' width='1229' height='790' xlink:href='data:image/png%3bbase64%2ciVBORw0KGgoAAAANSUhEUgAAAEAAAAApCAIAAAAK8LgbAAAACXBIWXMAAAsTAAALEwEAmpwYAAAKBUlEQVRYhdVZ%2b29b1R3Pj5OmaUITMBgUCgMhNIlJ%2b2E/bghtDFr6oAzGD0gTLZTRqtMmsVEeBTEYTeM0D9vX9577PPd17ttOsvEv7Jf9tDVOnUe35mEnjhMndWNfO3E8nXNi4zwaHm1gfHJ0dHzudXQ%2b5/v%2buuOOJ%2bP7j/B3Ps3tP8I/QMb9h8H%2bI/x9h/mHjvEPHuX3H8Hjzqe4fYfAfYf4ew6Cew6Cuw%2bA7x8A33uSu%2bMp7uHnhB/9Rtx/VHjg2a3jwWPCvYfAT19GxVJ4vbScz8/n8/mFhYWlpaWFhYVCE42bQMd3Ho89%2boJy2y%2b5e58Bjz4vPPYiv%2b8Z8MOj4JHn%2bAePgoeP8Q89yz98jP/uE9z9h8G%2bQ/zdB7i7nuZu/xV72y/Yb/0s8e3H2X2HhUeeF%2b86KNz9zNbxg0PC7U%2bBx14yi9fCXHZmGCM9MTFx5cqVS5cupdPpTCYzNja248nW19c/z2bHiT/Hf30q8vKfmFff5k%2bcBSfOglfe4l8hi%2bNvguNkceJNcPJt/uQ7wsl3xN%2b9K772rvjaOfG1d8TXz0mnzomn3pNePyeeOidsH6ffE06%2bDd74KyxdL9/oTF8C623o0FXxjT%2beEQBjGQob74USJwsJgYshXR5KuYNJZzDpDAT2J0OBZSiJWG8i1iMCBiSiImAELs6zMTqSnvXJUPLvg8GWMZTyBlNBhaBcLq8QXCeoVCr4QxkjDMOVlZXWa%2bVyuVQqhWFYrVbpx2q12npnbW2tRaZDliELAFR1TTehqkFVUyCeNd00kWWYFpkRsh1k2aqmk3fwTN7XoaarZFi2a7ues21YtmM5XqUSTk5OtXRmdGwsnU6Pj4%2bPXL6cyWRGR0fHxyfS6TRZjI8RjIyMjI%2bPZ0ZHh4eHR0ZGMplMOp0eGxsbHh7O5/MteXZommZZlm3biMBxHHsbLNt2Xdf1fMf1k8kg1cTAwEBrHQSBvxPoFyuVSjabzWQyk5OT2Wx2cmpyZmZmbm4un8/ncrmrV68WCoVsLjc7O5fL5mZmZmZnZ6dnMHK52ZmZmWw2Oz09Mz2N93K53NTUVEsIHYZhcBxnGIYkSbIsu667nQCyrMGU92Efev19XRZBX38/wzDxeLy/vz8Wi0Wj0UgkoiiK67q7ECgWl%2bbm8qVSqXFL0aHrOkKICgFfNsEWOViW7XmuaXmK7ga%2bh8/kug5Ba%2b37fhAEyW3wPM/zg3K5Uilfv7ZcrFarjUajXq%2bv3xwa7QRisZiu66IoMokEAIAXhESC5TgOAIAQ2pBA0vs4hs78xdBVuT8ajTMMACCRSDAMwwHAEnAsF4/H4wzDcRzLsn19fYIoCoIgy0o1rKRHp//xz5Hpqau3VggdmqZt13sqh3YJ%2bJ6rIU%2bAjuc6CD/C12/T7zkOlaHjOM1v4QemaTr4kWXZzupqOLdY%2b2/2%2btTkf7K53NraWhiGt8SrYglEIhFVVWVZThAJUCFwHKcoCuWGLGsg6V2IW3/4yDQ0yDCMKIoAAEEQeJ4HAIiiyLKsKIpUbkLzKYRQlmVV08tlHAdqtVqhUFheXp6fn5%2bbm1tdXf1C2nJDCdD7s5oXT93RFsMIfFdUnT5gO7alQGgYhqqqmqapmqaqqmEYmq5r2MniTU3TVQjpf9Z13TBRrVYrFpdyBLVa7eYvfhOBWCyu67osKxzHaZruONgRERP9VKkcx0km/VRAbNL3fTq3Iwg2tjb7U2zirlepVBqNRrVaLRQK8wSLGMXZOYyFhYXFxcUFgsXFxUKhUCSYny9Qo98FHQpUdR0HLcPEt2VSaVgWsnAIo8MwLeJs8KmDzUgmkzQCeJ63ZZ8Cfy3AkbjRaKzV62FYq1RCGmKr1WqFfgjDWq1Gd1ofa7VaGIb1ev0zCPASPB9DnGRGgXExYfSyRh9rdDMGK5qKjmQND0k1Pc8HAHz44UddXZHevr7z58/39PR0dXV1dnb29/f39PR2dnb29PZ2dUUuXLjQ19d74UJXJNLd2dnZ3d0d6b64srJyC3OhdnSIMhSgo%2bCDWrJmSyqSIBIhUjSkGkjV8Qx103FdhJAsSxAqECqKosiKIskyXsgKhJDGQWq4kiSJoqgoiiRJgiiKklyplEsra7ML4exitXitRuMApXSTMQF7IQA4CyGoKDwPTNPAYWmbV/V9D6p6lOETrBBPYNcuy7IoShBCnufxQbG/lwEAiqJgvyRJiqIIAo4DqqqFYeX0xYljZ//17Nl/v/TB5XK4WiiWJ6aWF5awat0MMAFN1y3LMk1T03Wbpj0kuG6JxDryGckF0OMUL/CbWt5U91Qq1T63FsSsk2FYiRiTZ7rTZy6OvMdPVCq14tL1XP5acXmlPbX8kgQEQTBNc0P0RPo80YR2DiTP8YLASwZ%2bclva5t4YxIW51IjX1%2buNBtacOsZaA6vP2k0aBiagqipCyDAMnfhwTdOwOyfSaKmQ53mO48hY9WVVVRUF631r3vCtu2aj5Nzr9fXGZ/mVLx4HqARUVZVkmWYWFO0E6HVu8MMxS9N0HMLohrUZrVBIEwqErKYE9sALaZomSxINmZCEz03SbyPgeR6EUFVVOmNPRCSgEoiiKDcFgvfJTDMUCFWaSuwVAQghJUCPQnwjPlZ7Pkdz/R0T5lYsawvKBNtUaK8IKIqCENI0TRQl/CdJ1NW350LYBmyHXrdOlIcKgS4Mw6DBeDuwKjZTib0lYBgGUW8dWzPxrbgSblMhx3WpzuOnzZnCNE3P2yh0toBUPXtMgGEY6kYFLAJREEQapFqlQssGiEJjb0ujrEwAVVXGMUto7YjixguSLOM6wd1jFUIkgSPuAm25vC02sGMa%2bqnS74SvwgYAAMg0JVnmef5Ts90M13WTyeQgwUATQ0NDAwMDg4ODO7YkaHD4KgigVgqNqBy2siC5kK8oSk9PT3d3d39/fzQai8fjEbLu6ooYhkGzhu0SoEX9HhLQdT2RSBgGLmgAwPWhsjmJaBFQVZXlOIZJ8DzPslwikYjFYhzH0Z4AdTi0T9GKg83/4%2b6tBNxmzNqxq9Vyo5qucxhAFHEpzPM8rYk5gOtgjsMtCWajW4GbGrhhQWYWgJU9DWTODc69RQIQwmg0yrIsvft4PI5bKeTosWiMZTmex/0YlmXxoclriY01t4cFjfZFCLAsCwBodz6t%2bfMkc18bAZu6UZJI4wIg8ION2v2GSej/IwHP8xTDY2Wnh7MZCQ/b%2bYYQsGgq4TiqjiCp9DVSLlu2/U2SQBDgvlAqiTtAnufS8c0gYFmYgOP6mumquOjHLSAajHe34K%2bIgOd5uxMwkfW3Af/0%2b8qPX2B%2b8mLi%2bFtS0rejMfz7gGmaX78XgqSg2YUAQtZQyn/zY%2bXnv40%2bcTz2%2bw%2bkgaSH6wZJsm376yegk7bKZ9pACvdG3WTgppK4xbj7L0vtBBzXK5VK9Xq9Vqut3mr8D5/tabgMylADAAAAAElFTkSuQmCC' /%3e%3c/svg%3e)
This will create a private key and downloads a json file containing all the required information to access your Google cloud storage under your account.
Create a Bucket for Galaxy
-
On the console page, click on the navigation menu button (
☰), and go toStorage > Browse. See the following figure:' width='1230' height='751' xlink:href='data:image/png%3bbase64%2ciVBORw0KGgoAAAANSUhEUgAAAEAAAAAnCAIAAAAw%2btlrAAAACXBIWXMAAAsTAAALEwEAmpwYAAAJsUlEQVRYhcVYe4xdRRnfxBggoGxleQg2xJSoiVHpLvugFKE8VNotwl8mxhikXUrvPY85M3POzJnXmXPvtssjmkorCMo/6r8i%2bs%2b2NID4WDVEjZZniWSlpfu6u9sWy3apYc3M3L3c7r27YbfFfvl2du45c87Mb77f933znZbWrvCSHmDa7nBVV/ipbqtdYWtX2NYDLnE/u8OLO%2b1de32VbVu7zMXWrvDTN4ArbwCXrzsLusq%2bs60nbO0ML1sHWjvDS3vMxTa7wrYesKobtHaBVd3wE5/vvegLd62%2bMWw5rx2uvjm%2boANesR5dvQFdcxu6Yj266iZ01U149c346g2m/cxN%2bPx2ePl6fMV6tKoHXtIDL%2b6GF3aij30FntcOr7wRf/YW3HY9unQdunQdXrFetg6f3wE/vhZ%2b7nZ8wXXwy5uSCzrgF%2b9IPtmF1twWX9QJr/wqvrgbndcOL%2byMW85va7lwddv1sKWjN7quN2rfFJnO5vm%2b/bl2o%2bnX67XfCDs2get6Qccmo%2b0bwdqNoLMXdG2Ouu%2bE3XfCrs2gq3fl2m5f6PTaO8K6vmnbN1bn7eiFHV/bsvb2vp7Nfkt/KWNMlHOlM6WUzLXqL2XlXJXzzHX6S8q2WUlLyUhMWIQoQBRASkha1kIrQWKEIcAISJ5qJVaseWa01qn1dSZKmRCc45giTCGiAWRcKJ7GLVJl395KKVOYSi/iKVeZzlTWRIWUAcAeoNsDp8SPaEIYYzyOE6eMcc7FmehiIqUglMeExwnHCYM4TZmI46Qly7JyrrXWuWmzJYQLEQCUJCmhjBBGKEsIixO7ZDuFEJKfsaQspWkToWnK2Lzy1AzkDGPcopQy14wwpdRSADiP47hcKulc5xaw0yzL5Lyo00UIkWWZ2R7bqCUlyzLGWRH420Nve%2bAVQq8Q%2boXAtx3b/%2bCW7YSeF3gGACEkjmNCiFLKzNPMEFprxlgcJ9u23Y8QhgghjBHGAEaEkMZHrNGNTZIkieMYIhRBuMTuSDPYPMIZRwhRSmP7YGypGScJRDACEcaYJGa1CKI0TQkhhkKcc621ME5ihLEmplBKMcaShGzdujWKIoSx53sQoTACcRw3AmCMOZtgKxGCURRZon4gtadqs0spCSFBEGCMgyAoFIsQQgBAGBktesUAhBDCEISFQgEiaAAopYIgkFKGYVgsFn3fLxQLXIj6NTkypGmKMC6Xy0opYDFAjHAc53ne1GJKKbc1WmtKKU1TQgmhNCGJ6RDCONPZB7NorTnnWZaVSiVmWc2sGMdIU611uVQu5aU8N38lK0lindjtt5vJbUwjkfI8j6IogtBNAyIYgghbF7bEb8IKC0C4exGEQRggKyEACKMIRjSlC2bhnLvxCUmAmS6CCEKEQBQJaV5Vm8mx3QCQUnqeJ4QAMNpeKBSLRc/3txe2e74vpay3QAShA6CkUJwqmWrJBvrznf16R1kvDWCeNFYbKCQs%2b93WmPF2H90el52Wy%2b6B3D5SQ1K1QG2hNRGWQvXc0Fo7C%2bS5TlJx93f9u7/jfeteeE%2bR31PkfaFoNIID4F4%2bH2gWhh0ntb4L%2bYSQhBAbJBDCCCKIY2xMASFEkDHm%2bFm1gFIqDEO3wX4QhGEIgLGe53kIY7dJJkVLGUEIIlgu6QCrL21K55V%2b/utJ5zcTIevofDqAxaOzmo9vJpM4C0gprb%2bkxlUIcRkyIdWIFMex8yv3YNUCSZJUg4xxLeNnjDEXy%2bp3qOYDQnAEQ4yjJEERCASj/YtSyCxosQRZT2jXcf7qfNe5b6M4/3bDTCKTUrqQZy5x6/tmDBNC1FPIOTGAsL%2bkPSTWbAjX3BJecytYsyFYc2vUdRdpagEpq3nAxHXbUkoRQi7tJHGSmBSUmJyCY5cKPrxIKeM4bjHkiSDnAsfY930AQBAGfuCHIKxfTdUHIphrzUS2DahtwLT3g%2by%2bUG6PZCNLHIXcTA6M6zgMzr%2blNOrG1HxgeQBqIcJ5vfln%2b3mpVL%2baXGsb16DdJ64V15nIFM%2bVyCRX0lBlwdHApNV5J15axJkAUEpZOxpvWbCIBRbA9uzgyADtacILApOMAfB83wWHRgt8GABy3tFXCMBGLso5d3ZYbBrOOYTIeVfNz5r9rLthnfijtUCWZRjjLMviJEbIBNvFpuScI4yXe44XYiG1GkXOe9AKLeCYDREMggAAsFjY5pxjjJc1hxDVTOwW6gJ8fZFEKOXzY1ZugZq4ZNnUAi6orxjAYqJOv7tSC0SRNOUiKBSLhWIRIdTMHY2gMwNQf35uyiW%2bJBebA3Alla2w8rIVG0j1Ai2VclNTLx%2bAO%2bi79EkoTRmjqWFSU8uI5UgVAOXi3q19MaEF3//e1r4t990HccyETLlwShmnjOOEkNS0QmULdclZbBmUmBBsizJTRSBzqm1KVLECAM/szp978vv7Hntg/xMP7X/8of2PP7j30YF9jz1Q02d/8rBpn3jwZ%2bUY%2b4WMwIxAlVQ1S6Dk5tzRVOzZxobT6rmmWvS56426EgpNHxj61dO/Pjz85sFXXz7wj7%2b/%2btKB6Ynxo5UJp9MT43978S8TI0cqY2NTgz8dfu6Xbw3te%2buPg4eG9h4aGvz3n54Z%2b/3TPx9gMRMmmywOo1GWtdlLATj20tALL/x27NDwyKHhf7328sGXDxybGD9WqerRibHhN16bHh%2btjLz97vO/GH7twOuvv3po%2bM33Zk7MnnhnZmZm7ujIUz/IIOVqeScxcdYADO5Sex/duXdP/292ZYM/6n/2iQcH9/TX6/4fPzC4p3/fozumfvfU0b/uH//z4NSL%2b2dfGZp56Q8nXxl675/PP/lwKU6ZPFcAqFD3ewFhshCEXhhRodLTlQpJueQqHxkbPzEzO/z2kbHK5Nzc3Pvvvz83Nzd76r8/3L2HErLcw/BZA6Az8ylRmzOpLtmSs1EzpUp5Pjpy5MR/3jly5PDo6Mjbhw%2b/NTw8Njp6cubd3Y88Qgg9ZwCUUp7nSSF8U8ubVGY%2bpzUksjzPR0ZGZmdnK5XKsePHJycnK5XK8XeOnzx58hED4NxZIJtfYq3QdOVBI4CJ8fHJqanX3zg4OjZao9CpU6d27959LgEopfr6%2buynnigIghAAP/AjGC0AUCqVDh48OD09PTExUalUpqamJicnp6enx8fHd%2b3aRem5o1CWZZRSV9S7hO8q1wU5Umvdv2OHlGrnzp0DAwM752VgYGC5Z5izDEApBREyNU1Ka594m34tTNMUQti0avn/r17UFfXy3i1b3HcY39YD5gNlsw8hXAhsy84Fck5WL%2bopVC6Xje9qV9A32fsqgJWeRj8icQD%2bB2s6Es8CYtvRAAAAAElFTkSuQmCC' /%3e%3c/svg%3e)
-
On the Storage page, click on the
CREATE BUCKETbutton, see the following figure:' width='1225' height='380' xlink:href='data:image/png%3bbase64%2ciVBORw0KGgoAAAANSUhEUgAAAEAAAAAUCAIAAACyFKxoAAAACXBIWXMAAAsTAAALEwEAmpwYAAAFU0lEQVRIie1WzWtcVRQftC7apkmatI21baoLFyJFISaZmWSSDLpQkWaSpi5Ku5CCtiWZeffc7%2b87k35AN9278R9w4V5sBavgyo0LoSAudFWoYhF0oZX7XvLyMpmkQRRdePjxuB/nnnvO%2bZ3z3iv1T8BwBQ5MwKEqHCzDUBmGy3EwOAlHpvBwBYYqcHASDozDYLo%2bMBm3MvRPpM9xGJiAYzU4MQMjVXh6KuLIX8WB8ejJ4CQcjrfjoTIcquI4reLUSdz3Choo8/0vvL134Gjfi%2bdK%2b8bg%2bCzZOwZHa/BcHT//GoxMwbEZMjqHj82Qk3V8YhafmMP7xmBkGh%2bZSoOswHAlWh8s474JeOJUUjqVDFXQSA3tH0d946g/vbUHKtusV9dweAo/9TKMzpGDZXyyTo7WyDMzeLQep6N1sm8MTtbJnpeS/rJ88virpVJpz7NvlKqNpHK6VZ1PqgswtQDTi7jaQNVGUp1PyvNJJQJV5lG1gaYX8cwZMrtEZpdwbRFmFqHSgPPnkmvYOuQ64EL6vEo8eZfUF1tzS7h%2bFupncX0Jz56B2TMwt4Tn4nht2hPTC1BtrGMBphpQnY/jSgOmF6OHtTNQW8S1haT25oXpRlJKmldOv/V60rwiGDCSYNQ0kq0G2/EmR9vpa6tecoxayxQnBFqrbXdjNXir7nxw6/sffvvx4aP7D/54%2bMujBz/9/vOvj%2b5/dfumRiA9oQqIwFS2g7va8UZxb5W3qu3t1Y7viWurvXF91TOhCFWEacYVYYqKuF5CCM6fv4AQcC4oZQBYCGmM1drkUMoY64SUmFCSwlrnnOfafHSr880nH9/7/NN7n9359os79%2b7e/u7Lu19/%2bH5bUqq8UFZIw6M9Z50TUmljtLHGRgO9YTejsCWU5dJGm%2bmAC2OtKyltrAtKmxRWaSuVkUp3wRgTQminEkLwUaLRjlU3DdxQEddlOpBoVbEYn3fBu0wzE1%2bcbC/e%2b%2byKLeu5zTU450pA1dI7DKi6vMLfW%2bHLiSBcdwEzbSMDBmEOmBEmgXDCpNROaMdNEKZdhDReaidVATqFspumuhsiPi3nDAAYY1rrPOztpMSFRlQJqbnQXBoutJDd4EJba6V2sfKYzAKgTEoVGeuJ7VzcGSINkjEKAJQytZsAjNYoaVljKCUIIcaoWRe7DpMaEkIghDhnsYiyUvL%2b70fwWaEWanXnAKJ70V2ttVJK69gZNpU8EmOMc84Yw7lQSuUK7p8Ruy676ZaS1rrVammtKY3EEUIRAoQQIRtURDasDVFi4%2bSm8zQUbo2dne8Wlbc6FFO1oVkcbwqmGFXR9Q0GhBBZ%2bqWUSikeRUgpuwLw3htjGGNCiCK5IQQhBMaEMU7iW5YyxjgXadVJANApxRhjzjlL9zKbUZlSLqImpfHtLIR0zhFCADClNLNpjFFKURrNpk8ulcodiAw0m82UAUYI4ZznDHaVkHNOa8OFTO9lQsgsJd57IUR2AWNMKZXnSQiR6WithRD5rveecw4AhQRvW04hBELIpUuXCSHe%2byyVOpUQQgwAANL6jukRQhT97mLAWgeYLq80l1eaCQLGY8JCCFpruS7GmJycfGytzWLIVrIjjGWfi8dICEFKCRhnHucGM1OlvEF7Jn5rAFobIZVU6bctPZs2gc89ca43Cg2TT8N2yluwUfxdNrO3UObMTpL3ABcSE0a5tLkXITAW/0FwWrtSyvw7muU4zzfguJsdoZQuL688lgHnXKfTAYCLFy9ijNvtdmYwa4xYQo91vRiAc37td2VzSnbO/YZOIYW7OeK2ENjFyRoDuw/gPyil/wPw/y4DfwJMBeE9dq5YUgAAAABJRU5ErkJggg==' /%3e%3c/svg%3e)
Note: in order to create a bucket, you would need to have an active subscription and have set-up payment options.
-
On the create bucket page, enter the required fields, and note the bucket name, and then click on the
Createbutton.' width='1214' height='720' xlink:href='data:image/png%3bbase64%2ciVBORw0KGgoAAAANSUhEUgAAAEAAAAAmCAIAAAD7pgrOAAAACXBIWXMAAAsTAAALEwEAmpwYAAAHkUlEQVRYhdVYy48cRxkfCUFEkAhnYwccZx1CwI4ICEXEiJPP3BGyQhASsZ31Outde/3ADgo3OHFBIByv7Rj5D%2bAhIaEcuFkKTnan59Ez09Ndj67umX5Mv6q6qrpRdXvX611H7NqDN/np06fqmhr196uq79WNfcfBwTm47wR48W00cwoenIMzc0rvfwt%2bax5%2b4234wmk4cwruOw4OzMLnT8HnKn1gVsn%2bk2rZvuPg2ZPgO0vo%2bxfwtxfQocVHl8Nn0ddPqjcemFU2HFpAB04p/ewJcGgB7TsOXpqHe49b%2b2fx3l%2b09vxwYe9P/tn4ys/ha1fcZ94AhxfQa5fso%2b/aM3Pw1Yv2K0v4lSV85DJ59aL9vfP2M2%2bAl%2bbRN%2bfR107Ag7NgZtZ6fhbseRPs%2bSV4%2bpj59DHr8CI%2bctl%2bbhYdnEMzjyovnEZfPGZ9dwnvfwu%2bOI9/9GtycA4d/Y3z5Z9ZR98lX3rdOnKFPPXT4VdPjp768Qef%2b/zTX/jBbxsLV43Tf%2botXDXOXbeWroPzN%2bHisrn43vDsteH8n40zV4dn3hueuTpcvGZeuAnO3wC/ugXfuW2/c9u%2b/Bd05bZ96ZZ98Ra5cBNeeh9ceh9cvgUfUy7cAIvL4OwyWFy2Fq5ZZ5fBwjXr3PV7%2bkylzy6Dc9fh0h//s7RsNPTOyh9%2b/zuj3wrHNoEDbOppNC5LXpZsg9CyFGEiirJM4hAMu8Dohh7BYIBMHRpdnrNyl9AwhuZf//Z3C0A/CG3imBb0/CCjLM3ouiQpZSwfTQTlRZZRbBOE7bHnE%2bJim2CbUJZzIbmQYk3WxxsntyN8ByK4kI08z8uyzBUYr8AYo1tQLSukFEVRbN2G4j7kg7oebPh52mhEUXTnzp0syxBCpmk6jqOoPAhKaVEUhDiapo3HHmOsNqWizRnLRQ0uhCyELLkoc14IUVbjQqqtFWp3OZdSTvkKUUrDMFzf6U2m3ycgizAMAACu40AIEUK2bQe%2bHwT%2beDxyHGcymfj%2b2Asi4gvb42icj0Jue7kbMN/3giDwPc9xSJqm9YlNjUCappZlMcYcx7Esy3Gc2uJNBKQQUUIBcpE9RvbIGQVjP6J5wXhZC80LWmnGZc4l45LllVZS/VotztgUjV87gSzLGGNpmkZRlKapugtrzrBOQAgxCujdFb3ZNj5a1f0JCxMRRHkY8zDmwZr%2bJFlf4wb5dC9RI8sy0zQZY67r1hcDIQwAdF33QQJ865%2bLopRrsj7eOLl5RhZSTnX/y7LBGIvjmDGWJEkURXEUeZ7n%2b34Yhpuc2HXdlZWPu93u6upKq9Xq6TqlmfJNqURwrqQ6vdql1eQGSCmma/p9HzAMg1I6Go2UXwaBEKIKL/kmAkEQ9vt9jPHAMCzThFAdF8bYcRxs27X/YIxt2yaEIIQghMS2XZcAYEIAHMfh/CHHOIUrhDFmjHm%2bTwjxff%2bhYVRKmSQxhNDzPFLBcRyEEMa4vni16QCASkNCiBo7PnRCYHvE9eM4yvP/AwHGmJSSMZXF6gvw0DAqhKCUxnFcO32WZcrp4zitUM8kSZKmaRzHSZJUj3HGRJjIKCvytesz5RhUVgTWg%2bYnpYKaQJIkhmFgjC3LwhgTQkzTBADWtwghZFlWfRoAgGrS9b1xWRZlKccjd2AYruvWiX/KBP4n1glQSk3TbGpau93udruapjWbzU6no%2bt6p9PRtKaud3W922yu6rrearVWV5sI4bIsw3BCCAmCYOpu0NgRASklxrjdbuu63u12DcPo9/u9Xm8wGPT7/f5gaAE8NGG/P8AYDYdD3/c2vU9KVR09aQKMUi5ElqWFlKPRiBBiE%2bKORgCAqqpQRRRC0J8wN5ROKGh%2bz8QtNVwhhNgFAlRFIZFSHk6SOI7iWGWMuqrZiEKqwq2own%2bdyx9IBGv5YIrWl9snUBbCm4iBaWvaaqfT6Xa74/F44x5XzroLaGyTQO18QeC3Wi3TNKdeFT8JAlIW4/FY0zTLsqbui0/oBCilhmFACMtPDRrbJCCESNMUY%2bx5myPj7qKxTQJSyjiOe71eFd39JEnEzsE5381MLDgnNkYQGoO%2bbWOpWmC%2bI9RF%2b%2b4RkKotzEXJZZnzkjKZMVE5886wOwSkEBkroEuJx2yPoRFzA%2b74nKuPXarn2mRfPdhq9NTJNLZJgPOt/ZRKXvWXnwdmH2ZZXU1sfX2xVmU8AQK8KEoAQLfbtSwAIdxopeM4nU7HMIxerxeGYZqmvV4PYzwcDjudjmVZURQVRcEY6/f7AIDBYFCXgGEY1gH6kU9jRwSKfr%2b/sqIa4sHAaLeVxe12m1Lqum49WEvYwcrKilZV3ZZlra6q6mM0GuV5rmna3bt3m02tLmY1Tev1eqpUeSInUFSNWJIkMc2yVLVd6qlq6HmWZeu7mOe5WlS1ZuufC7Isq/rSe6j7uDiOJ5PJ4zQJO4hCsiiz6uMUF9XHw0qYUB782SklchnEwg1yPM5tL7f93CQ0Y8oFH5lF8XgbsINyGrrsgw%2bDf3808Sd5IVVS/TTUc43tEEhTWpbFjX84L7/%2b4ZE3P/7XnREGg3ZHZ4x9NgjQqiOLU2kRCl1G1Z2Zfk59NPwXNBPThk9gU/UAAAAASUVORK5CYII=' /%3e%3c/svg%3e)
Step 2/2: Configure Galaxy ObjectStore
In order to setup Galaxy to persist data on a Google bucket, you may take the following steps:
-
Enable Galaxy ObjectStore configuration by setting the following key on the
config/galaxy.ymlfile (notconfig/galaxy.yml.sample):object_store_config_file: config/object_store_conf.xml
-
Create the
object_store_conf.xmlfile and set it as the following:<?xml version="1.0"?> <object_store type="cloud" provider="google"> <auth credentials_file="THE_PATH_TO_THE_JSON_FILE_YOU_OBTAINED_FROM_GOOGLE" /> <bucket name="BUCKET_NAME" use_reduced_redundancy="False" /> <cache path="database/object_store_cache" size="1000" /> <extra_dir type="job_work" path="database/job_working_directory_gce"/> <extra_dir type="temp" path="database/tmp_gce"/> </object_store>Note; the above configuration is the minimum set-up required for Galaxy to persist data on a Google bucket; for advanced options (e.g., defining a hierarchy of multiple backends) see Galaxy ObjectStore configuration page.
-
Restart Galaxy for configuration to take place. At this point, any new dataset uploaded to Galaxy, or generated by Galaxy (as a result of tool/workflow execution) will be uploaded to the specified bucket. See the following figure:
' width='1225' height='429' xlink:href='data:image/png%3bbase64%2ciVBORw0KGgoAAAANSUhEUgAAAEAAAAAWCAIAAAD/3A1jAAAACXBIWXMAAAsTAAALEwEAmpwYAAAIyklEQVRYha2XaXAcxRXH9SEkhISkAja2iyOxQwg2CXYRAsFckoiBYFMEEqeKVAyyjUHXztHd03fPsSvZspXrIxUf5aSSj6l8yBcKx%2bEyEBtiDqdCGXCsSJZW92Vrtbuzu5PqmZWQhAwqKl2/murunaNf93v/97bmklvAdXXoS98Hq%2b6BX6%2bD39qEVt0Nr61F19Si6%2brQN%2bo119aiy26FV90FV92Dvno7WHYnWLYRXnEHuPw28JXbwRdu0VxTC1ffh67cCJfdOY/ld8GVtWhl3ZJYUYsuvQ2u3excfge8%2bRGy/F60bgu%2b6l50dS266i545Ua48m506S32l3/APrfye5//4mWXbDBr1tSZN2yy19Sb19db3/6htfZ%2b63rdN264z1hTpzsx5upa84b7zBs3mWvvt2560P7Og/ZND9jrHrDjZ6019clP%2btd1c1h7v3XjJuvqW1tWrG9ataF55XrNqg2alXqmZdWG5hXrm%2bbytXVNy29uuuKmpuXfrV6Xr2/%2bZr05y%2bo6Y029vXrjk6tve2x1nVVjA/DTrT97prERIMe0bNOyIXII5ZgywmIow5QxzhHhVEiIUKthGpZlAZAyzZRhOhgLpZgQQgqHcAMyMyYFOOKkcZu3t/WFw788/mzm1QN7Xj%2b45/X97a/9bvdrBzv%2b8Wz6xf3tr/yh88Tv9x3/iM7jh2euh/cd/%2bNvTvwWvtyyrV0FnAspZIIQUgnlCSlrkAO3bt3a3NJEKAYQGKaBHKRcKZWYi%2bspSKRQLia4NdVqWiaE0DCNlGEQiv3Acz3XD1yHSUAkosphqtViAKPUE3tOHRuJoihfqpQrUSWKSlFUjiqVKDo/NZYv5qIoiqcXafqBKDp7anLXT9qDduF5nue7VbwY362hnCtXciG4FEJp%2b5gQlPMFcCH8wPMDP0gH6UwmSAeer4d%2b4Lueq1yV4Hoq%2bQBljGDqZ4TRsOfk3weiKCoVS1ElKpcqpbBcCsthsVQu6ZWHxVJYLJdLlWKhNEs8E5WK2oD33hjZ/uPAy4j4A2oBNQ5lj%2b/CFqItNmk0SKtNEGELgJhqJ%2bHMtCwAgQ2Ag7HruYvge8pVjkMpY67nBW3SaNjz9kuD%2bgTy4cTEZD6fn7vHk5OTYRgWi8XJycm582EYjk9MjI9PFEq5994Y2vlY2m%2bT%2bgMf%2b2KNQ3mjzSDhEDPb4QBzhy4EESaVwgSnDMOy7cSAeL/1K2Y3w/M9zgVCWAjh%2ba7rzjPg/Pmp3t6%2b2RUXCsVyuTI6OjatW354eKRYDJNWKpXy%2bcLg4NDQ4PCF6YlTr/fvfCxzUQOEFAgBLjjGGCLoYCcOkYUoVzLpppAi3PV8DxMMEWKcCSkgghAh5DiOQyzLBgA4xHGwo5Q714CJifPnzvWcO9d7%2bvTp/v7%2brq6uSqWSj1sul%2bvpPpfN9g8Pj2Sz/blcrlgsdnf3TOf0cb1/cmzHoxc/ASEFpkRIwTjDhFBGpZIJHzNAmYgjKqSSyZZLpVGekkoihAllyp3jpsr1MyL1ZNWAUqlSKpcXhGmhUCgWCvl8obe3b2pqSgeuDm/tQr19fdnsQBSVPnhrfMejF4%2bBZAsZZ4RSBzuYYOQ4ECEtjnMMkEp6vhsEfjATuLNBLKV0HKJcN0gHfuB7vt4nz9eakW5XxvaOGQPKyeI%2bEpmKHlbiNl99qjOJCr1/cnTnp5wAwUwwyijGGBOCHAQRxGS%2bAVpYpWFasfYbhFIAoWmZzS2tzzQ2My4s2zYtyzBNiBBlzNFvokSgxp%2bn33oxdqGx893dPb3n%2bs6cOZvNDvy3q7tcquSmpnO56elcPpsdGBwcGhkeHegfnJrKFfLF3t5s4kKn3xz9FBcCUMcAofQTXEi7iqvjmFCCCZFKEUpTKRNApNcpJSZ6wdU3SMk5Z1xIj7Y80fbOy9qAYrFwIXe%2bGOanC1OFMFeIM0A%2bP60p5Lq6z05eGK9EYVjOR1GlUCx09ZwdGMxGUeXDd8Y/SYWEFKZlxgGAbWBDhBYN4sQknS7ijIscx7KgVFp5EiGKX5dkF1dpBdJTQZtMPdFx7M8D%2bQvRWLY8OVjRDEWTg5rx/nLCWH9ptC8c6y9NDFQmBivjA3pyNBsO9xRy49HJI6PbH8kE7Rc3QLkqWWIcl/M2fp4LSRmHCjEt27IAZdT1vCSOF0fbJwlI73y4s2FLpmFLW8Pm%2bLqAzfq6fUv79oerNGxpf/KhzLYfpbc9lG7Yknm83t/5CxBkvGRfFjFgKej1eD5iynY4YYTo%2bohQRtKZIEj7CclpzEPnApdJgghwKKxCZqAQU4QZcghEBAJkW8A0LCNlpgzLsIAJHAsRiCmUrkjO9jMawIWuhUzT2bHDaG11LAO1NFmtzbbRCoFNEmyLcKZvW6h0SsVHrwsML8HXzfU85XpCKMYEIQJjTqngXEqpktt8X9%2bZ9D%2bunvNk9FMQQnocGV4H%2bMvhXx09sPf5A3uPHOo8eqjz6MF9fzuw98iBvUf2dzx/qPMF2XSQcT43N8/F9dwkiihlGFNHZzuiSw5dZVYTy4JnE%2bWY6ejQmvNrMlzKCQihAp56yv/3iaFEN8JStZ4phvkwLOgyYWoiiqJDnUcbn251iIO0klI/8GO1RaZppVImoQwAmEqZNoA2gBiTZLkQIQB1bcI493zPcRwAYCLlAFZzPKEssR9AgAnhXLj%2b0l1ICOVzY5f39qs9URT29vZkB/qGRnSOLIb5QnG6UJzuH8yWo3B/53O2iVxPMS4o5YQwqAsMgnWOZrrOjZN9kiIT75Jxca/1Id7lWE5mRbzaiZk9imrf9RQXXCq5VAPMp73n/nS6672xN186889Xzp481vWff42dOTX64bsjH7wzfPJY14fvjv6a/jXVYlOqYzxesVa2alaON0xIodMlwcn8rMPMDcoFw4uhC8elGqD/J3DOlPXUbnPHbrCrA%2bzqsHd1mDvaZ9gdD/fAlrR0tTfPhOviH15ErLzPQvKepcqodGXQpoI25Wekpq06nJ0M2qSfWdLm/X/5Hyv2/RGuQJpwAAAAAElFTkSuQmCC' /%3e%3c/svg%3e)


