Adding system users to the cluster
By default, each CloudMan cluster comes with basic system users: ubuntu, galaxy, root. If you would like to add additional system users, we have provided a script that will add any number of system users to the master node and any worker nodes. To create users, start by creating a file with a list of users:
user1,password1
user2,password2
Place the file in a directory on a cluster-wide file system (e.g.,
/mnt/transient_nfs/) and call the add-cluster-users script, passing the
full path to the file as a single argument: add-cluster-users /mnt/transient_nfs/user_list.txt
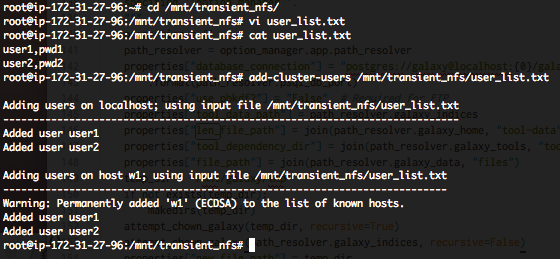
Once added, the users can ssh to the cluster using the specified password to authenticate. If you need to add more users in the future, just edit the file to append the new user names and rerun the script.
Note that this feature is available only on images released after Oct 2016.
Using custom CloudMan application
When you launch a new CloudMan cluster, the most recent released version of the application will be used. If you relaunch a previously existing cluster, the same version of the CloudMan application will be reused as the last time the cluster was launched (even if a newer version of the application was released); this is done to maintain the reproducibility principles of your cluster.
When launching a cluster, the CloudMan application is automatically retrieved
as a tar ball from a central location (currently, cloudman bucket on S3 for
new clusters or your cluster's bucket for previously existing clusters). To use
a custom version of CloudMan it is necessary to provide a custom version of the
application source code; depending on the intent, this can be done in one of
the following ways:
For an existing cluster: note down the cluster bucket from CloudMan Admin page and replace files
cm.tar.gzandcm_boot.pyin the bucket with your custom version (see more below on this)For (any number of) new clusters: create an S3 bucket and place
cm.tar.gzandcm_boot.pyfiles in that bucket. When launching a new cluster, provide the name of the bucket in the Default bucket form field on the launcher application.
File cm_boot.py is available in the CloudMan source code repository.
If changes are required to this file, take a look at the module
[cm/boot](https:// github.com/galaxyproject/cloudman/blob/master/cm/boot/init.py)
and make changes there. Once done, generate the cm_boot.py script by invoking
the following command from the CloudMan root directory: python make_boot_script.py and then upload the file to the appropriate bucket (see
below).
File cm.tar.gz is a tar ball of the entire CloudMan repository. If you are
editing an older version of the the application, first download the cm.tar.gz
file from your cluster's bucket and extract the archive, make desired edits,
recreate the tar.gz file and upload it to your cluster's bucket. If editing the
development version from the source control repository, create the tar.gz file
with all the files while sitting in the application's root directory.
Want an easier and faster way to upload your changes? Take a look at this repository with scripts that make the process of updating and uploading required files easier: https://github.com/afgane/CloudMan-update-scripts
Customizing your Galaxy CloudMan cluster
It is possible to use the cloud infrastructure management functionality offered by CloudMan while customizing the default deployment it offers. In the context of Galaxy, this means that it is possible to run a custom version of Galaxy, use your own set of tools, and reference genomes.
Keep in mind that this page deals with the CloudMan-side of customizations and how to ensure those changes get persisted across cluster invocations. See this page and then individual services about additional information on how to customize the applications themselves (you will probably want to do that before you do the actions described on this page).
Note that the process of customizing an instance may require use of the command line tools. In order to modify your cloud deployment, follow these steps:
Start a CloudMan cluster instance by following instructions on the getting started page
ssh to the EC2 instance and perform desired customizations.
From the command prompt, connect to the newly created cluster using the following command, filling in the appropriate details:
ssh -o StrictHostKeyChecking=no -i <path to your private key> ubuntu@<instance public DNS>
Next, perform the desired changes to the system. The changes supported at this
level of instance customization include modifications to the file systems
managed by CloudMan. The available file systems are listed on the CloudMan
Admin console under entry Persist changes to file system and are mounted on
the underlying system under /mnt (e.g., /mnt/galaxy). Modifying contents of
these file systems allows you to customize your instance of Galaxy, install or
modify tools, as well as modify reference genomes used by Galaxy tools. As you
perform the changes, you should respect the ownership of the directories;
currently all of these are owned by galaxy user. Note that if you plan on
modifying the Galaxy application, stop the process first from the CloudMan
Admin console.
- Use CloudMan Admin interface to persist changes to the file system.
After you have completed all of the desired modifications, disconnect from the ssh session so that your login cannot interfere with filesystem unmounts/remounts. On the CloudMan Admin console, click (under Persist changes to file system) on the name of the file system you wish to preserve and CloudMan will perform the required steps to persist any changes. Note that depending on the amount of changes you performed to the given file system, this process may take a while (Amazon is making a snapshot of the EBS volume and that can take a long time). Once the process completes, you can go back to using the cluster as you normally would; all of the changes will have been preserved after you terminate & relaunch the cluster.