GMOD Summer School 2014 - Installing Galaxy
This page was created in May, 2014 for the ‘Installing Galaxy’ workshop, part of the GMOD Summer School Program for 2014 and in cooperation with The Generic Model Organism Database project.
The version of Galaxy used was 13083:3534f67acd2a of the galaxy-dist repository. If you’re using a newer version of Galaxy, procedures and images used for the tutorial may have changed. See the current pages for the features mentioned for updated information.
The class was taught using an AMI instance from
Amazon’s EC2 web service (U.S. East)
and the AMI instance id is: ami-907e97f8 (which is an Ubuntu AMI with only data installed for this tutorial).
Familiarity with Galaxy is helpful but not necessary. If you’d want to explore how to use Galaxy from a user’s perspective, you may want to view The Galaxy 101 Tutorial.
Introduction
There are two sections to this workshop page:
- command-line installation and configuration: primarily geared to users who want a basic installation of Galaxy with an eye towards setting things up flexibly should they decide to scale up at a later date.
- administration from the web: introduces new admin users to the management of some of Galaxy’s most useful features including tool installation, library management, and workflow creation.
Advanced installation will be covered lightly but will provide good resources for those that already know they need a large scale server installation.
Galaxy requires a Unix-like OS to run: Linux, Debian, Redhat, and (for the most part) Mac OSX. Galaxy servers cannot run on Windows OS.
This series of instructions assumes you are (relatively) familiar with using a terminal and some experience with using a text editor in the terminal (nano, vi/vim, emacs, etc).
----
Command-line Set Up and Operation
Galaxy can interface with many complex and powerful computing resources such as compute clusters, dynamic resource managers (DRMs), and virtual cloud servers. It’s also designed to allow thousands of users to work simultaneously on many analyses at once.
It can also be very useful on a much smaller scale: a single lab or even a single user. To begin here, we’ll start with:
- some of the basic set up,
- how to avoid some future problems if you decide to scale up,
- and how to do basic administrative tasks that will allow your users (or just you) to do analysis with Galaxy
A ‘galaxy’ user
In many cases if you are building a Galaxy installation for that will serve many users, process many jobs at once, or think that you may at some later date, it is a good idea to perform the following installation using a non-sudo user specifically for Galaxy (i.e the ‘galaxy’ user).
Create a galaxy NON-ROOT user named ‘galaxy’ and switch to that user:
$ sudo useradd -m -s /bin/bash galaxy
$ sudo -iu galaxy
By switching to the galaxy user and doing the next steps, you’re ensuring that the process that runs galaxy is not dependent on a normal user account and that the process will have permissions and access to all the files it needs.
Downloading and Installing Galaxy
You’ll need python 2.6 or higher.
$ python --version
Python 2.7.6
Galaxy is best downloaded using the Mercurial distibuted source management system:
$ hg --version
Mercurial Distributed SCM (version 2.8.2)
(see http://mercurial.selenic.com for more information)

Copyright (C) 2005-2013 Matt Mackall and others
This is free software; see the source for copying conditions. There is NO
warranty; not even for MERCHANTABILITY or FITNESS FOR A PARTICULAR PURPOSE
See also Using APT to get Mercurial for an example of installing mercurial via APT (a unix package manager).
- As the galaxy user, create the directory where you’d want to install Galaxy on your server (in this example, a
folder named
ourgalaxydirectly below galaxy’s ‘home’ directory):
$ mkdir ourgalaxy
$ cd ourgalaxy
$ pwd
/home/galaxy/ourgalaxy- To download Galaxy (from the terminal/command line):
$ hg clone https://bitbucket.org/galaxy/galaxy-dist
# Mercurial will download the galaxy-dist repository to /ourgalaxy/galaxy-dist ...
destination directory: galaxy-dist
requesting all changes
adding changesets
adding manifests
adding file changes # ...
When the prompt in your terminal returns, the download has finished:
# ... the numbers here may be different
added 13084 changesets with 44579 changes to 8097 files (+1 heads)
updating to branch default
3504 files updated, 0 files merged, 0 files removed, 0 files unresolved
$
NOTE: cloning the full Galaxy code repository can take some time. Please, jump to More Resources while we wait for it to install.
- When the download is complete, update Galaxy to the most stable version/branch:
$ cd galaxy-dist
$ hg update stable
  # Mercurial will let you know which files were updated ...
The Galaxy development team endeavors to quickly fix bugs and improve Galaxy all the time. By downloading with
Mercurial, we can easily ‘pull’ changes, fixes, and updates from bitbucket.org to our server when they’re available.
More advanced users may also consider installing Galaxy in a virtual environment with virtualenv. This will create a
clean slate for your python dependencies and paths (including $PYTHONPATH). For more information see:
Use a clean environment
and:
Create a Python virtual environment
The universe_wsgi.ini Configuration File
Galaxy is highly configurable and much of that configuration is controlled with the file universe_wsgi.ini. When you
first download Galaxy it will include a ‘template’ of the universe_wsgi.ini file named universe_wsgi.ini.sample
(you’ll see this sample template pattern for many of Galaxy’s config files). The sample file contains all the
original/default settings availble for configuration. Don’t alter the sample file directly - instead, copy it to
universe_wsgi.ini and change settings there:
$ cp universe_wsgi.ini.sample universe_wsgi.iniNext, let’s add ourselves (NOTE: not the galaxy user) as administrator to what will be our Galaxy server:
- Open the
universe_wsgi.inifile in a text editor. - Find the line:
#admin_users = None. - Read the comments before that line. Most settings in
universe_wsgi.iniare documented with comments before the setting and can be turned off (and set to a default) by adding the#to the start. There are currently no admin users. - Uncomment that line by removing the
#from the beginning - Add the email you intend to use for your administrator account:
admin_users = <your-email> - Save and close the file.
Most of the changes to universe_wsgi.ini can be done using the above steps: search for a line, change or un/comment
it out, and save (optionally restarting the server afterwards - shown later).
(for more information and another example see: Admin/Interface)
----
Installing PostgreSQL
Although Galaxy can be run imediately with the included SQLite database (‘batteries included’), one of the best ways to prevent later problems with your installation is to begin by using a full database such as PostgreSQL: http://www.postgresql.org/
$ psql --version
psql (PostgreSQL) 9.1.12
contains support for command-line editing
Even if you’re the sole user, you may find that you want to scale up at a later date (more users, compute cluster, etc.) and a fully functional database server like PostgreSQL is an important part of that process. It can be difficult to move any existing information from a SQLite database to Postgres (or MySQL) so, by doing this now, future-you may be quite thankful. More importantly SQLite does not support concurrency - which roughly means that queries may fail if more than one user is using the database at the same time.
PostgreSQL can be installed with a package manager. Installing, starting, and configuring PostgreSQL is beyond the scope of this tutorial but more information can be found at: their admin documentation page and a quick command line example here: Install and configure PostgreSQL
Let’s create a postgres user named galaxy for our system galaxy user:
- Log out of the galaxy user and back into your sudo/admin user role by pressing
Ctrl-d. - Use the postgres user to create a postgres galaxy user:
sudo -u postgres createuser galaxy
Shall the new role be a superuser? (y/n) n
Shall the new role be allowed to create databases? (y/n) n
Shall the new role be allowed to create more new roles? (y/n) n
(Don’t give any of the permissions prompted for.)
- Then, create a databse for our installation with the galaxy user as its owner:
$ sudo -u postgres createdb -O galaxy galaxydb- Log back in as the galaxy user for the rest of this part of the tutorial:
$ sudo -iu galaxy
$ cd ourgalaxy/galaxy-dist- Change
database_connectioninuniverse_wsgi.inito have galaxy use postgres as the database:
database_connection = postgresql:///galaxydb?host=/var/run/postgresqlSome important points and suggestions for setting up a Galaxy server with a full database can be found here: Use a clean environment
----
More Configuration
Debugging
Disable the debugging and development settings:
debug- comment it out
# Debug enables access to various config options useful for development and
# debugging:                                  ... Debug mode is disabled if
# commented, but is uncommented by default in the sample config.
#debug = Trueuse_interactive- comment it out
# Enable live debugging in your browser.  This should NEVER be enabled on a
# public site.  Enabled in the sample config for development.
#use_interactive = True
See the Production Server Help for why you’d want to change these.
If you run into problems, you can turn any of these back on and they will provide more information and may help with the debugging process.
Security
Set the id_secret to make Galaxy’s ids (encoded versions of database ids for your resources such as session ids,
dataset ids, etc.) unique to your server:
- Generate a random piece of text. This will be combined in Galaxy with the database ids to encode them:
$ date | md5sum
# NOTE: you're result will be different here
b9bf59c1cf5e910ef87b1494ac032e25  -
(We’re using only the first part of the output - don’t copy the space and hyphen at the end)
- Set
id_secretto that text:
# Galaxy encodes various internal values when these values will be output in
# some format (for example, in a URL or cookie).  You should set a key to be
# used by the algorithm that encodes and decodes these values.  It can be any
# string.  If left unchanged, anyone could construct a cookie that would grant
# them access to others' sessions.
id_secret = b9bf59c1cf5e910ef87b1494ac032e25
Port Number and customization
You can (uncomment and) change the port number Galaxy serves from to 8081:
# The port on which to listen.
port = 8081
NOTE: for our example we’ll keep the port number at 8081. To provide a clean url without a port number, the best option is probably to start using a proxy server: Using a proxy server
Change the listening address to 0.0.0.0 and uncomment:
# The address on which to listen.  By default, only listen to localhost (Galaxy
# will not be accessible over the network).  Use '0.0.0.0' to listen on all
# available network interfaces.
host = 0.0.0.0
Without this change, Galaxy by default only serves to 127.0.0.1 and its web pages would only be available on the
machine serving them at: localhost:8081. By making this change, we’re allowing anyone who knows our URL/IP to connect.
And change the ‘brand’ or name of our Galaxy server here:
# Append "/{brand}" to the "Galaxy" text in the masthead.
brand = GMOD
Of course, you can change this later to suit your lab or your needs.
The tool_dependency_dir
The final change we’ll make before we log in is to uncomment and add a tool dependency directory in the
universe_wsgi.ini file. This is a directory that will store the programs that Galaxy tools rely on to function as
we’ll see later in Tools:
tool_dependency_dir = ../tool_dependenciesIt can often be useful to place this directory outside the Galaxy installation folder to make updating Galaxy or sharing
its tools easier. In our case tool dependencies will be at /home/galaxy/ourgalaxy/tool_dependencies. The directory
will be automatically created - you don’t need to do that.
----
run.sh: Start Up, Stopping, Re-starting and Log Files
In the ‘Galaxy base directory’ (/home/ourgalaxy/galaxy-dist), is a script named run.sh. This script allows us to
start and stop our Galaxy server. There are many scripts for administrative tasks in the base directory, scripts
directory, and cron directory and they’re worth exploring in a text editor.
In the foreground
Galaxy can be easily started as a foreground process in a terminal window with the run.sh script in the Galaxy base directory:
$ cd ourgalaxy/galaxy-dist
$ sh run.sh --reload
# ... Log file outputs to screen showing db migrations/upgrades, tools loading, etc.```

In this case, the log file outputs quite a bit of information to show you what is loading as Galaxy starts up. This
is also a great place to check for errors (not only on startup but as users use your server).

Note also the `--reload` switch. This serves two functions:
1. It will cause the server to automatically restart if there are any changes to the core python code (useful when
  debugging code). You'll see a line labeled 'restarting' just after you make the change.
2. On many terminals it helps to allow stopping the server just by pressing `Ctrl+c`. Without the `--reload` flag,
  `Ctrl+c` can behave erratically on some systems.

Go ahead and stop the server with `Ctrl+c` and we'll restart it in the background using the `--daemon` switch.


#### In the background with a daemon

```bash
$ sh run.sh --daemon
Entering daemon mode
## (No log file this time)```


This switch starts Galaxy in a background process allowing you to continue to use that terminal window for other things
or close it altogether. This also implies some other things:
1. Galaxy (or more accurately, Paster: the server technology currently behind Galaxy) will write log messages (by
  default) to a file in the base Galaxy directory named 'paster.log'.
2. Galaxy will write the process id (pid) of the background process used to 'paster.pid'. This will allow you to look
  up process information with the unix command `ps`, etc.
3. `Ctrl+c` will no longer stop the server.

In order to stop the server in this mode, the easiest way is:
```bash
$ sh run.sh --stop-daemon
But you can also kill the process with the id mentioned in ‘paster.pid’.
The --reload and --daemon switches can’t be used together.
Galaxy can also be started as a service. init script examples are included in the contrib directory of the Galaxy
base directory.
Restarting the server
In order to restart the server, simply shut it down and bring it back up (which can be accomplished with a single command):
$ sh run.sh --stop-daemon; sh run.sh --daemonNOTE: you’ll see many sections here and elsewhere in the wiki ask you to restart the server: i.e. to stop the paster
(web) server and restart it in order to re-load any changes in the configuration you may have made. Using the above
command will do this in daemon mode; when using --reload the server will do this automatically.
The log file
The log file is not only a searchable record of activity on the server but also provides information on errors. It’s often a good place to look when the UI is reporting an error or when something isn’t behaving correctly.
Galaxy does not delete or clear the log file between starts and stops and it appends the most recent log messages to the end of the file. That means that you’re able to scan it for past information as well.
This also means that the file can grow quickly. To ‘rotate’ your log files, see: Rotating log files.
It can be useful (for this tutorial or anytime you’re configuring your server) when running in daemon mode to open a new terminal window or tab and ‘follow the tail’ of your log file:
$ tail -f paster.logIn this way you get the benefit of seeing the most recent messages and can still use Galaxy as a daemon.
Go ahead and start up the server so we can log in:
$ sh run.sh --daemonWhen the server has successfully restarted and is ready you’ll see:
serving on 0.0.0.0:8081at the end of the log output.
----
The Admin Web Interface
Your Galaxy server should now be running, so let’s log in to our admin account with a browser:
- Open your preferred browser (Chrome, Firefox are recommended but Galaxy works also with IE+10) in the virtual machine.
- Using the address bar, go to
localhost:8081- you should see the Galaxy ‘Analyze Data’ home page. - From the top menus, click:
User->Register(Registeris a link in a sub-menu ofUser). - Register your account using the same email you set
admin_usersto inuniverse_wsgi.ini. - Reload the page or click
Analyze Datato get back to the home page now as a logged in user.
Later, if serving your lab computer or from behind a proxy, Galaxy can be accessed from other computers at:
<your IP or server URL>:8081.
Once your Galaxy server is running, many of its functions can be controled over the web through the administration
page. Click Admin from the top menu.
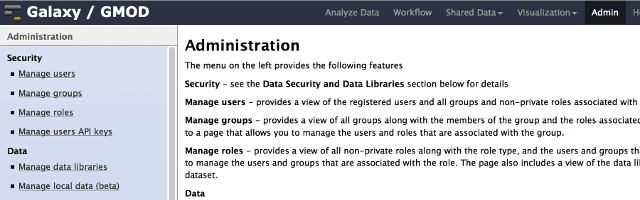
Here you’ll see a page where you can:
- Install, manage, and search for tools: bioinformatic programs/applications for user analysis
- Manage data libraries: commonly used datasets that can be copied quickly by users
- Create, delete, and manage users as well as: separate them into groups, give them roles, and set data limit quotas
(for more information on other admin options, see: Admin/Interface)
----
Libraries
Although it’s easy enough for users to upload the data they need, Galaxy also provides a way for them to access centralized data stores called ‘libraries’. These data can be accessed and copied (more quickly than upload) to users’ histories where they can be used as input or reference data when running tools.
Very often, Galaxy is not the only bioinformatics platform using data on a cluster or even single machine. Chado, Tripal, and GBrowse may need access to the same data as Galaxy. Bioinformticists and others comfortable with command-line analysis will need to run tools directly on those data. This implies that we might want to build a library from a central or existing location on the file system.
Also, if these data are very large, it’s preferrable to not use the normal route of moving data files into Galaxy: uploading. Uploading will make a copy of that data and isn’t a very efficient use of space.
Libraries have the option to move files into Galaxy using a symlink. This allows a central location to be used (and still accessible to other platforms and users) and prevents duplicating the data.
We’ll create a library for raw reads that all investigators might need access to. We’ll symlink it into Galaxy so that we can save some space and use a central location on the filesystem.
Example data
Let’s drop back to the terminal quickly to see the data we’ll use for the rest of this tutorial:
$ ls -l /data/galaxy
total 4
drwxr-xr-x 2 ubuntu ubuntu 4096 May 16 17:29 isolates-raw

$ ls -l /data/galaxy/isolates-raw
total 43904
-rw-r--r-- 1 ubuntu ubuntu 22476934 May 16 16:49 SRR1182403_1.fastq
-rw-r--r-- 1 ubuntu ubuntu 22476934 May 16 16:49 SRR1182403_2.fastq
Of course, in a production environment you’d use a group for access to these files and make the galaxy user a member of that group especially if it’s clinical or sensitive data.
SRR1182403 is paired-end short read data in the fastq format. The organism is Saccharomyces cerevisiae. It was downloaded from the Short Read Archive of NCBI here: http://www.ncbi.nlm.nih.gov/sra/SRX477904
Only 1,000,000 reads from the original files are used in order to make analysis quicker for this tutorial. The shortened files can be downloaded here: https://usegalaxy.org/u/carleberhard/h/saccer-srr1182403
library_import_dir
To import this directory directly, Galaxy needs to know where to look. To do that, we:
- Open
universe_wsgi.iniin an editor. - Search for, uncomment, and change
#library_import_dir = Nonetolibrary_import_dir = /data/galaxy - Restart the server
Now Galaxy can import whole subdirectories of /data and their files easily.
A data library for raw isolate reads
Back in the browser, go to the admin page and on the left click: ‘Manage data libraries’:
- A page title ‘Data Libraries’ will appear in the main panel. Click the ‘Create new data library’ at the top right.
- A form will appear to allow naming and description of the library. For this example, only change the name to ‘isolates-raw’
- Click the ‘Create’ button. An empty library list will load titled ‘Data Library “isolates-raw”’.
- Click ‘Add datasets’ at the top right. A form named ‘Upload files to a data library’ will load.
- Change ‘Upload option’ to ‘Upload a directory of files’ using the drop down menu.
- Change ‘File Format’ to
fastqsanger. You can do this by clicking the drop down, typingfastqsangerto search for it or scrolling to it with your keys, and clicking that option. This is Galaxy’s preferred flavor of fastq. - Change ‘Server Directory’ to our directory
- Change ‘Copy data into Galaxy?’ to
link to files without copying into Galaxy- this allows us to not duplicate large data files. - Leave the remaining options at their defaults
- Click ‘Upload to library’. A new page will load displaying the status of the upload which should complete quickly. Both ‘SRR1182403’ fastq files should be listed.
The two files are symlinked into Galaxy without duplication and are now available for use by all users. The
data/isolates-raw could potentially have hundreds of files in it and the above import would still apply and import all
the files in that directory.
----
Tools
One important thing that only administrators can (and should!) do is install the tools necessary for their users to perform analyses.
Installation of bioinformatics tools can be a complex and frustrating experience involving building programs from source code (compiling) and hunting down and compiling any code the original code depends on (‘dependencies’). The Galaxy Tool Shed system greatly simplifies this process - allowing admin to install mappers, assemblers, etc. using only the admin page.
Galaxy tools are not (generally) bioinformatics programs themselves but XML files that ‘wrap’ an existing, command-line-only program. Among other things, the tool wrapper file defines a form interface for the tools possible parameters with help and explanation.
See also: Adding Tools from a Tool Shed
Programs and their dependencies will be installed to the directory setting tool_dependency_dir in your
universe_wsgi.ini file (which we set here). They can also be invoked on the command line
from there (or added to your PATH). For example, if we have installed bwa, we could use that Galaxy tool installation
from the command-line to index a yeast fasta:
~/tool_deps/bwa/0.5.9/devteam/package_bwa_0_5_9/ec2595e4d313/bin/bwa index -a bwtsw sacCer2.faTool Sheds
Tool sheds are another type of Galaxy server that allow collections of tools. The Galaxy team provides access to two of their Tool shed servers ‘out of the box’ to every Galaxy installation: The Main Galaxy Tool Shed and the Test Galaxy Tool Shed. Other public servers may run their own tool sheds and serve domain specific tools and wrappers they’ve created from there.
Galaxy main tool shed Galaxy test tool shed Public tool sheds See also the comprehensive documentation on Tool Sheds here: ToolShed;
Installing a tool from a Tool Shed
Let’s look for and install some tools from the Main Galaxy Tool Shed. There are two ways to find tools you’re looking for: A.) browse all the available tools and B.) search for specific tools. Let’s browse first:
- Go to the admin page if you’re not already there.
- On the left hand menu of links, click
search and browse tool sheds - In the center panel, you’ll see two drop-down buttons:
Galaxy main tool shedandGalaxy test tool shed - Click the arrow on the right of the
Galaxy main tool shedbutton and you should see a menu appear. - Click
Browse valid repositories
This displays all available tool categories and the number of tools in each one. This is a good high level overview for when you may not know specifically what you need.
Now let’s go back and look for something specific: tools for fastq manipulation and quality control. We’ll start with FastQC, a program that produces an HTML file with graphs detailing the quality of your fastq reads:
- Again, on the left hand menu of links, click
search and browse tool sheds - Click the arrow on the right of the
Galaxy main tool shedbutton to make the menu appear again. - This time, click
Search for valid tools. A search form will appear. - Enter
fastqcin theTool Namefield and pressSearch(searches are case-insensititve)
You should now see a list of tools with ‘FastQC’ in the tool’s synopsis
5. Click the checkbox next to the row whose owner (the last column) is ‘devteam’
6. Click Install to Galaxy at the bottom of the list (note: by selecting more than one tool from a search, you can
install multiple tools at once)
7. A page will appear detailing how to install the tool and where in the tool menu to make it available
8. Most of the settings here can be left as is (the defaults) - but are worth reading their help text for later,
more advanced options
9. Under the section labelled ‘Choose the tool panel section to contain the installed tools (optional)’ and
the prompt ‘Select existing tool panel section’, click the name ‘NGS: QC and manipulation’. You should see the
radiobutton (the circle to the name’s left) become ‘checked’.
10. Click ‘Install’.
Step 9 above will make the FastQC tool available to users in the tool panel in the section titled ‘NGS: QC and manipulation’.
A new page will appear that lists the tools to be installed and the progress of their installation (‘New’, ‘Installed’, etc.). Wait for the progress to change to a green box labelled: ‘Installed’.
NOTE: if you see a red error message saying: ‘Repository installation is not possible due to an invalid Galaxy URL: None. You may need to enable third-party cookies in your browser.’, you’ll need to do just that (at least for the duration of this workshop).
To enable 3rd-party cookies in Firefox or Chrome, see: enabling 3rd-party cookies
Let’s check that it was installed and is now available:
- Click ‘Analyze Data’ to get back to the main/home page
- In the left hand tool menu, click ‘NGS: QC and manipulation
- You should see a link with the text: ‘FastQC:Read QC reports using FastQC’ - that indicates the tools is installed and ready to try.
Again, see also: Adding Tools from a Tool Shed
----
Exercise: building a QC pipeline
Often it falls to a site administrator to do the initial, basic QC for new data. We’ll now install some more tools to do that and try them out on some isolate data from a library. Also, it’s best to automate this process as much as possible so we’ll convert this trial run (if it worked) into a workflow (AKA pipeline) that will reduce this process to a two click operation.
Using the procedure in Installing a tool from a Tool Shed, search for and install the following tools:
fastq_paired_end_joiner:
- search with the tool name ‘fastq joiner’
- The owner is ‘devteam’ and
- the description is: ‘FASTQ joiner on paired end reads’
fastq_filter:
- search with the tool name ‘filter fastq’
- The owner is ‘devteam’ and
- the description is: ‘Filter FASTQ reads by quality score and length’
fastq_paired_end_splitter:
- search with the tool name ‘fastq splitter’
- The owner is ‘devteam’ and
- the description is: ‘FASTQ splitter on paired end reads’
Using the tools above, we’ll:
- copy some raw, paired-end isolate reads into a history
- join them into one file using the joiner - if we don’t join them, the pairs will be mismatched after we filter
- filter them by quality using the filter tool
- re-split them into two files
- run fastqc on each of those files
1. Copy isolate data
When the tools are installed, in the top menu, click: ‘Shared Data’, then ‘Data Libraries (Beta)’. This is the new user interface for libraries and allows users to quickly import data from libraries into their histories.
- Click ‘isolates-raw’
- Click both ‘SRR1182403_1.fastq’ and ‘SRR1182403_2.fastq’ to select them
- In the library menu above, click ‘to history’
- Leave the selection at ‘Unnamed history’ (this is your current, empty history)
- Click ‘Import’
- You’ll see the progress of the import and should see a message that they’ve been successfully imported.
- Click ‘Analyze Data’ to get back to the main page.
- You should see both of the files you imported in the current history panel on the right hand side of the screen and both should be green.
(Aside: Histories)
Histories can be thought of as workspaces, workbenches, or current directories. They will contain all the output files from a user’s tool analysis. A user can have multiple histories but only one will be their current history. When tools are executed on some input data (like our read datasets we imported), they create jobs. The status of a job (queued, running, finished, errored) is shown as the ‘state’ of a dataset in the current history and a color is given to each:
- queued: grey
- running: yellow
- finished/ok: green
- error: red
For more information on histories see: Managing Datasets and: Managing Histories Screencast Video
Many history options are available from the history options menu which can be opened by clicking the gear icon at the top right of the history panel.
2. Join the paired-end read files
Now, we’ll run the paired end joiner tool on the two read files we imported:
- In the left hand tool menu, click ‘NGS: QC and manipulation’
- Scroll down to ‘FASTQ joiner on paired end reads’ and click that link.
- The center panel will open with a form that controls the parameters the tools will use. The joiner is relatively simple but some tools can have complex parameters. There will always be help at the bottom of a tool form to explain parameter settings.
- Click the select dropdown under ‘Left-hand reads’ and then choose ‘SRR1182403_1.fastq’
- Click the select dropdown under ‘Right-hand reads’ and then choose ‘SRR1182403_2.fastq’
- Click the ‘Execute’ button
- A new, yellow (or grey) dataset will appear in the current history panel ‘FastQ joiner on data 1 and data 2’. This indicates the tool is running. If we wait it will eventually (and hopefully) turn green to indicate that it’s done.
3. Filter the joined reads
Next, we’ll filter that joined dataset by quality. This time, we’ll search for the ‘Filter fastq’ tool using the tool menu’s search bar:
- In the tool menu, click the search bar that currently says: ‘search tools’ enter
filter fastq. Note how the contents of the menu are filtered and change with every letter entered. Using the search, users can quickly narrow their hunt for an appropriate tool by name or description.
Notes on tool searching:
- Searches can be cleared by deleting the text or pressing the circular close button on the right of the search bar.
- Both the name and description are searchable.
- Workflows are currently not searchable and the ‘all workflows’ link is always included in results
- When you’ve entered the text fully, there should be only one tool shown: ‘Filter FASTQ’. Click that tool.
- In the tool form, select your dataset ‘3: FastQ joiner on data 1 and data 2’ under ‘FASTQ File’ and enter
- 0 in the ‘Minimum Quality’ field. This is the minimum phred score a read base must have in order to be included in the output dataset.
- Click ‘Execute’ and wait for the job to finish and the dataset’s color to turn green.
4. Re-split the joined, filtered file
- Using the tool menu, find ‘fastq splitter’, choose ‘4: Filter FASTQ on data 3’ for ‘FASTQ reads’, execute, and wait for the job and (two output) datasets to finish.
5. Re-split the joined, filtered file
Next, use FastQC to get quality reports on each of the split, filtered files:
- Search for ‘FastQC’ in the tool panel, and execute using ‘5: FASTQ splitter on data 4’ for ‘Short read data from your current history’
- This time, instead of waiting for that job to finish, click ‘FastQC’ in the tool panel now, choose ‘6. FASTQ splitter on data 5’ and execute
Galaxy allows users to run (or at least queue) jobs without waiting for others to finish. As long as a tool/job has access to an input dataset, you can queue a new tool/job using it as input. Even if the job that produces the input dataset is still queued or running you can run a tool and start a job with it. Galaxy is smart enough to wait until the job creating the input dataset is finished to begin the next. 3. Wait for both FastQC jobs to finish.
----
Workflows
When a series of tools and the parameters used to run them have been found to successfully answer a question for one subject (or do other housekeeping like the QC we just performed), they can be saved to workflows (roughly AKA pipelines) and then run by other users with other input files. This can standardize analysis and make tedious procedures easier to repeat over many subjects.
Manually creating and editing workflows
One way to create a workflow manually using the Workflow editor. See the following wiki pages for more information on that:
Extracting a workflow from a history
Another way is to export it from a history containing a successful analysis that you’d want to repeat with other input files (i.e. a prototype) like the QC we just did. Let’s export our history into a workflow others can use on different isolates:
- Click the gear shaped icon at the top right of the history panel. The history options menu should open.
- Click ‘Extract Workflow’ from that menu. The center panel should open to page that allows you to set many options for the new, extracted workflow including:
- A workflow name
- Your input datasets - these will be marked as the workflow entry point because of the checked checkboxes ‘Treat as input dataset’
- Your join, filter, and split jobs
- The two FastQC jobs
- In that panel, change the name to ‘Basic fastq QC’
- Click the ‘Create Workflow’ button. An info box should appear saying “Workflow ‘Basic fastq QC’ created from current history”.
(See also: Creating a Workflow from a History Screencast)
If you’d like to view the workflow in Galaxy’s workflow editor:
- Click ‘Workflow’ in the top menu.
- Click the arrow on the right of the ‘Basic fastq QC’ workflow in the list. A menu should appear.
- Click ‘Edit’ in that menu.
- You can examine the workflow, change parameters, edit, have the workflow rename the outputs, and more from the editor. Don’t forget to save the final result using the gear icon at the top right of the center panel.
If you’d like to have the workflow directly available to users in the tool menu:
- Click ‘Workflow’ in the top menu.
- Click ‘Configure your workflow menu’ at the bottom of the page. A new list should appear.
- Click the ‘Show in menu’ checkbox in the ‘Basic fastq QC’ row.
- Click ‘Save’ at the bottom of the page.
Publishing a workflow
Workflows created by users (including admin users) are by default not available to other users. They must be published first. Let’s publish the workflow so that others can use it:
- Click ‘Workflow’ from the top menu. The list (currently only one) workflows appears.
- Click the arrow on the right of the button labelled ‘Basic fastq QC’. The menu for that workflow will appear.
- Click ‘Share or publish’. A page with sharing options titled “Share or Publish Workflow ‘Basic fastq QC’” will load.
- Click ‘Make Workflow Accessible and Publish’. The page will reload with both a direct link to the workflow and new options to reverse the procedure and unpublish/make it inaccessble again.
- You can now view the pubished workflow by clicking ‘Shared Data’ and then ‘Published Workflows’ from the sub menu.
There are several other options on the sharing page:
- ‘Make Workflow Accessible via Link’ provides the link to the workflow (allowing others to import it) but does not list it in the ‘Shared Data’->‘Published Workflows’ list.
- ‘Share with a user’ will share it with one or more users directly allowing them to import it. Users are selected by email and only users currently registered on this Galaxy server can be selected. After sharing, users will find the workflow in their ‘Workflow’ page under ‘Workflows shared with you by others’. Users not selected will not be allowed to access or import it.
Many items can be published and/or shared in Galaxy: workflows, histories, visualizations, and pages (project web pages created and edited from within Galaxy). See how in the Sharing and Publishing Screencast
Workflow notes
- It’s possible to change parameters when running workflows. For example, a user running our QC workflow could choose to filter at the phred score of 40 and not 35.
- Output and intermediate datasets created by a workflow can be re-named automatically.
- Emails can be optionally automatically sent to users when workflows complete.
- Metadata such as dataset type and what columns represent can be altered automatically.
- Intermediate files can be hidden in a user’s history making analysis a bit clearer.
- Almost every tool available from the Galaxy Tool Sheds or already installed on your server can be used in a workflow.
- It’s possible to run and automate workflows via the command line or scripts using Galaxy’s API.
Again, see Creating Workflows and Advanced Workflow Options for more information.
Testing our QC workflow
Let’s run our workflow to test it (we’ll use the same data):
- From the home page, open the history options menu, and click ‘Copy datasets’. The center panel will show an interface allowing you to copy selected datasets.
- Select ‘SRR1182403_1.fastq’ and ‘SRR1182403_2.fastq’ on the left hand side.
- On the right hand side, in the field labelled ‘New history named’, enter ‘Test’
- Click ‘Copy history items’ at the bottom of the page.
- You’ll see a green info box at the top saying “2 datasets copied to 1 history: Test”. Click the ‘Test’ history name link.
- The page should reload with your new, current history named ‘Test’.
- In the tool panel, at the bottom, click ‘All workflows’. The center panel will load with a list of the available workflows including (and most likely only) your ‘Basic fastq QC’ workflow. Click that ‘Basic fastq QC’ link.
- The center panel will load with options on how to run the ‘Basic fastq QC’ workflow.
- Select ‘1: SRR1182403_1.fastq’ for the first ‘Input dataset’ (Step 1 on the page)
- Select ‘2: SRR1182403_2.fastq’ for the second ‘Input dataset’ (Step 2 on the page)
Note: this is where you might change the workflow parameters if desired. Each step can be expanded by clicking the yellow step box and will list the default parameters for the workflow. Many parameters will have an edit button to their right which allows the change (for example, expanding ‘Step 4’, you’ll see the edit button next to ‘Minimum Quality’). 11. Click ‘Run workflow’ at the bottom of the panel/form.
You’re history should now be populated by all the datasets that will be produced by the workflow and, one by one, the jobs you ran originally by hand will now be run automatically on the input datasets.
----
More Resources
The following are great places to start when trouble shooting or planning an expansion of your new server:
Galaxy
- A custom Google search is available to search all things Galaxy including: this hub, mailing lists, our biostar site, Galaxy’s code documentation, and even the data on our Main public server.
- The Galaxy Biostar (now help.galaxyproject.org) site is a Q&A site designed on Istvan Albert’s original Biostars site.
- Our Trello board (now replaced by GitHub issues), which can be used to track our development and allows you to vote on our priorities.
- A Wiki page for all support resources is here: Support.
Unix System Administration
- Serverfault is a Q&A site for systems administration.
- The Debian System Administrator’s Handbook is a comprehensive guide to (one flavor) or Unix sysadmin.
Advanced Configuration for Production Scale Galaxy Servers
- Running Galaxy in a production environment
- Nate Coraor’s excellent page for the BioIT workshop on Running a Local Galaxy Instance